Contents
Duo provides several enrollment methods to add users to the system. Self-enrollment allows users to add themselves to Duo and walks them through setting up a device for two-factor authentication. Larger organizations may prefer one of the automatic enrollment options, like synchronizing users from an external Microsoft directory. Administrators can create individual Duo users at any time (manual enrollment).
Overview
Users — and their phones, tablets, or hardware tokens — must be enrolled into Duo before they can start using the system. Enrolling may include the optional step of activating the user for Duo Mobile, which allows your users to generate passcodes from the Duo Mobile app or use one-tap authentication with Duo Push. In order to use Duo Push, users will need to install the Duo Mobile app on their devices and then add their Duo account to the app. This process will only take the user a few minutes.
Duo administrator accounts are only used to log on to the Admin Panel. They can't be used to access devices or applications using Duo two-factor authentication. Be sure to also enroll your Duo admins as users if they need to log on to Duo protected services.
Users (identified by their usernames) are shared between applications, so a user only needs to complete enrollment and activation in Duo once to gain access to multiple applications. User access can be restricted to specific applications through permitted groups for individual applications.
An enrolled user is an end user who accesses Duo-protected services or applications, who exists in Duo as a user with an associated two-factor authentication method. A partially-enrolled user is one who exists in Duo with a username but has no two-factor authentication methods. These users still need to complete device enrollment and activation to fully use Duo.
There are three methods of user enrollment: automatic enrollment, self-enrollment, and manual enrollment. The automatic enrollment and self-enrollment methods save you the time and effort of manually adding your Duo users.
-
Automatic enrollment: Admins can add a group of users and then send them activation links that the user follows to complete their enrollment. Users are created in Duo immediately.
- Active Directory sync: For customers who already rely on an Active Directory (AD) domain. Learn how to use AD sync.
- OpenLDAP sync: For customers who use an OpenLDAP directory for authentication. Learn how to use OpenLDAP sync.
- Entra ID sync: For customers using a Microsoft Entra ID domain as their user identity store. Learn how to use Entra ID sync.
- Import users: Admin can create detailed entries for each user with a simple CSV file. See more information about importing users.
-
Self-enrollment: Users add themselves to Duo through a browser interface and step through the installation and configuration of Duo Mobile. Self-enrollment takes less than two minutes for most users.
- Inline self-enrollment: Features an interactive setup process that is seamlessly integrated with the user's next login. Inline self-enrollment is available for applications featuring browser-based logins as well as Duo Unix.
- Bulk self-enrollment: Creates new users in Duo without any 2FA devices and sends an enrollment link to the users via email in a single operation.
- Manual enrollment: Admins manually add individual users and send activation links.
Duo Premier and Duo Advantage Plan Users: Global Policy settings affect access to the enrollment portal used by bulk self-enrollment. Do not apply any global restrictions that could prevent user enrollment. For example, if you configure the User Location policy setting to deny access to a country, then the policy will also block any of your users who attempt to enroll in Duo from that country via a bulk enrollment link.
Automatic Enrollment
An alternative to self-enrollment is to use Duo's automatic enrollment features to create users, associate them with devices, then generate a Duo Mobile activation link for each user. The automatic enrollment features are Directory Sync and Import Users.
Directory Sync
Role required: Owner, Administrator, or User Manager.
Since many large organizations already rely on an on-premises Active Directory (AD) server or OpenLDAP Directory, or a cloud-hosted Entra ID directory to manage their users, Duo offers tools to import users and groups from those identity stores into Duo, with the option of automatically sending an enrollment email to every user imported without an attached phone who has a valid email address.
See the Active Directory Sync, OpenLDAP Sync, or Entra ID Sync instructions.
Import Users
Role required: Owner, Administrator, or User Manager.
Duo provides an Import Users feature that can import user information from a properly formatted CSV (comma-separated values) file. The import users feature differs from bulk enrollment in that it allows the admin to supply additional user details (e.g., entries can be created already populated with a phone number and device platform, group memberships, multiple devices, etc.). Also, users imported this way can be managed from the Duo Admin Panel right away.
Although the import users function is primarily intended to add users, you can also use it to update information for existing users and to delete Duo users whose accounts are no longer needed.
Unlike bulk enrollment, the import users tool does not automatically send enrollment emails to users. Follow the Activating Duo Mobile After Enrollment instructions below to send activation links to your imported users.
Self-Enrollment
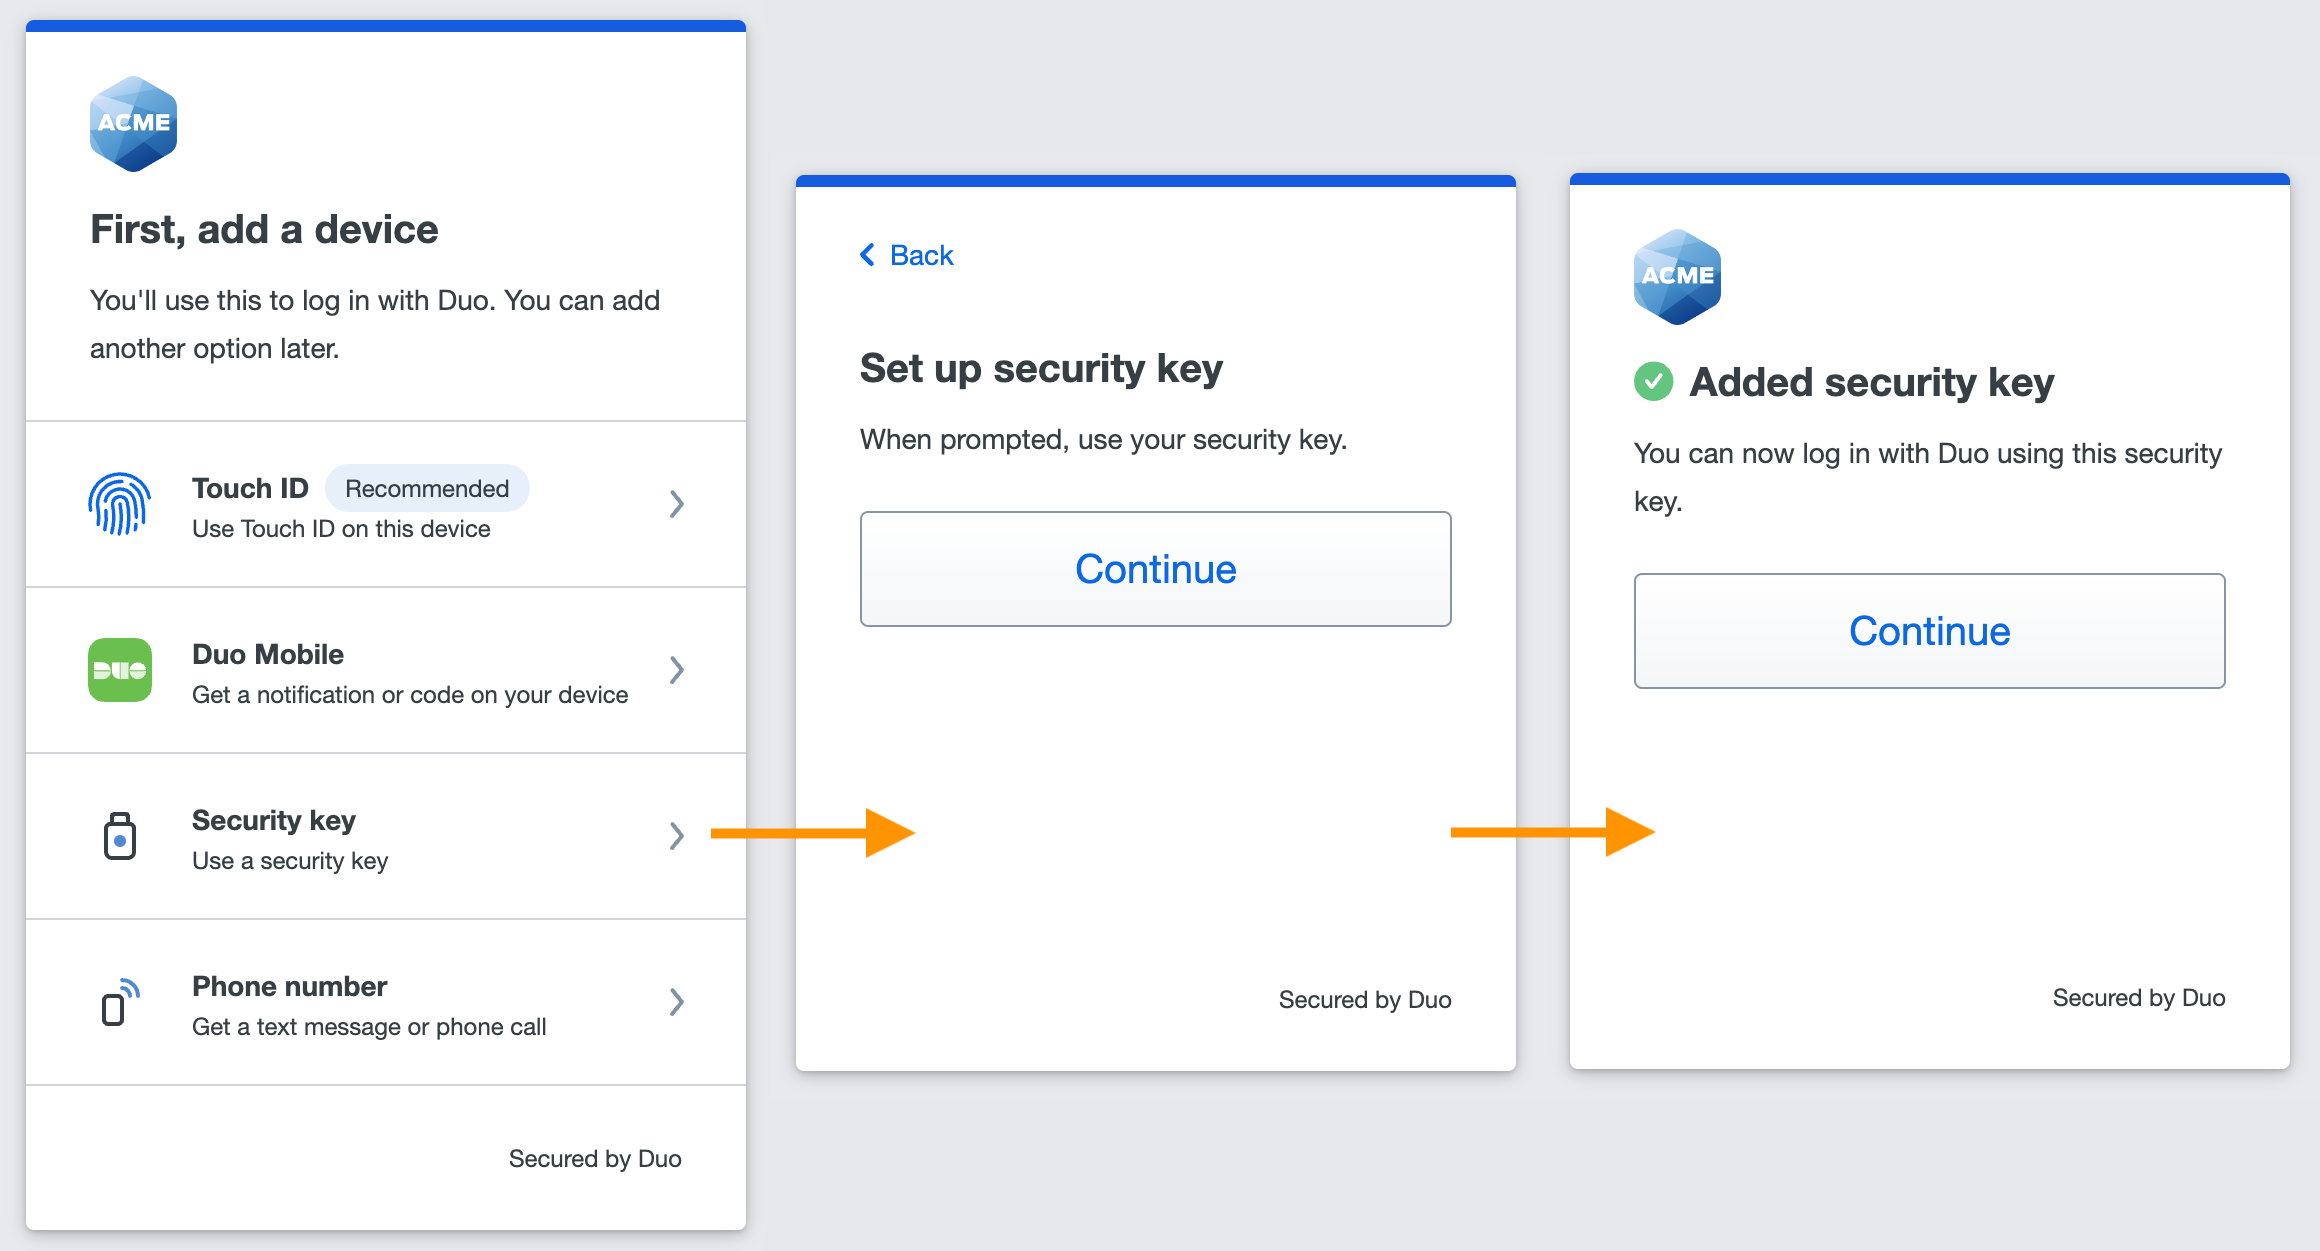
Duo recommends allowing users to enroll themselves whenever possible, either using inline self-enrollment or bulk self-enrollment. In either case, users add themselves to Duo by following online instructions to install Duo Mobile on their mobile devices and add their accounts. Self-enrollment takes just a few minutes and each user only needs to do it once to start logging in with Duo.
See the Universal Prompt Enrollment Guide or Traditional Duo Prompt End User Enrollment Guide for a complete walkthrough of the self-enrollment experience for users.
Universal Prompt Self-Enrollment
Traditional Duo Prompt Self-Enrollment
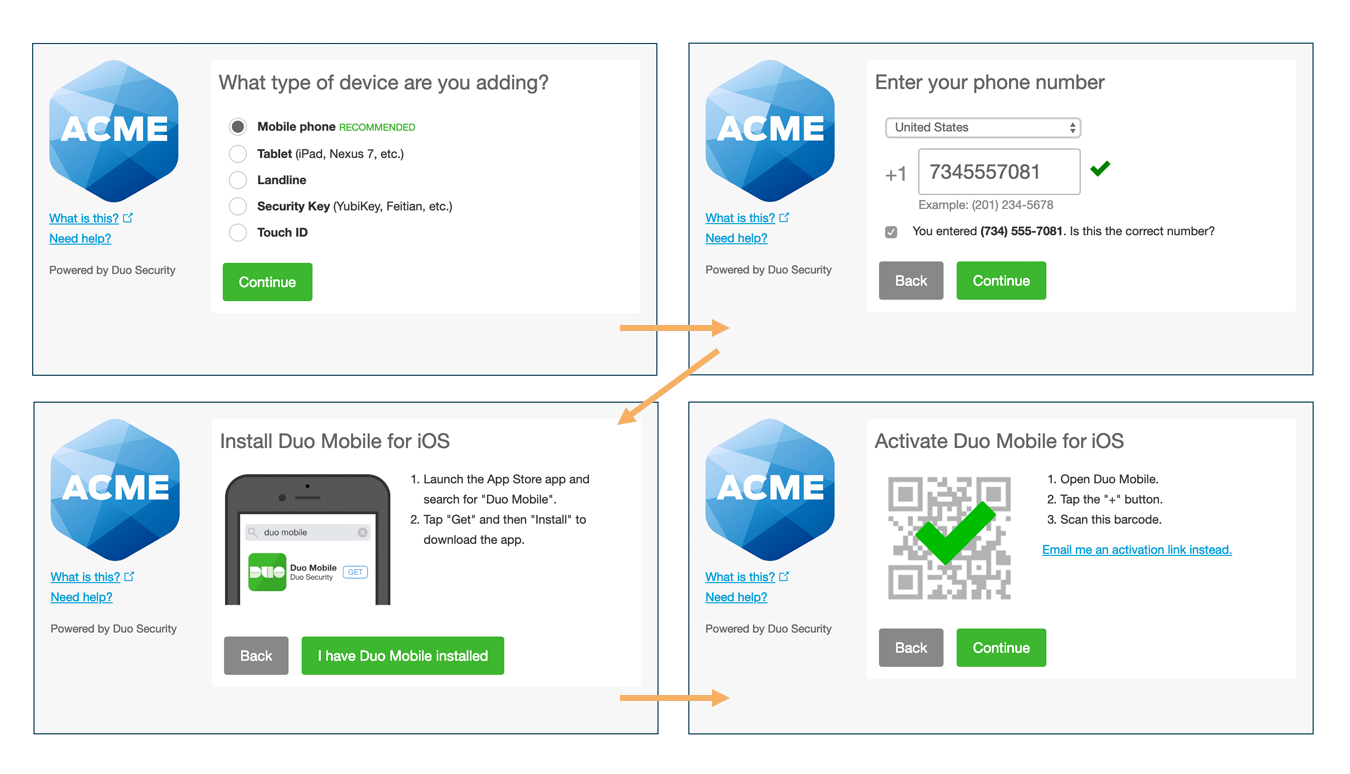
The iframe-based traditional Duo Prompt reached its end of support for most applications on March 30, 2024. Customers must migrate to a supported Duo application with Universal Prompt for continued support from Duo
Learn more about the end of support of the traditional Duo Prompt and options for migrating applications to Universal Prompt and review the Duo End of Sale, Last Date of Support, and End of Life Policy.
Inline Self-Enrollment
Role required: Owner, Administrator, or Application Manager.
Inline self-enrollment is available for web-based applications that show the Duo Prompt in a browser: Duo Single Sign-On applications, AD FS, Outlook Web Access, WordPress, etc., as well as Duo Unix applications (Duo Unix users are given an enrollment link that they can copy and paste into a web browser).
You can enable inline self-enrollment for an application by applying a policy with New User Policy set to "Require enrollment".
Bulk Self-Enrollment
Role required: Owner, Administrator, or User Manager.
If your application type doesn't support inline self-enrollment (as is the case with OpenVPN, RDP and RDGateway, certain VPN clients, and some others), then you can use the bulk self-enrollment tool to send enrollment links to your users via email. If your organization uses email filtering, be sure to allow the sender no-reply@duosecurity.com.
-
Log into the Duo Admin Panel. Click Users in the left sidebar, then click the Bulk Enroll Users submenu or click the Bulk Enroll Users link near the top of the page.

-
Type or paste in a CSV (comma-separated value) set of usernames and email addresses. The "Bulk Enroll Users" tool won't send a new enrollment email to an existing enrolled user.
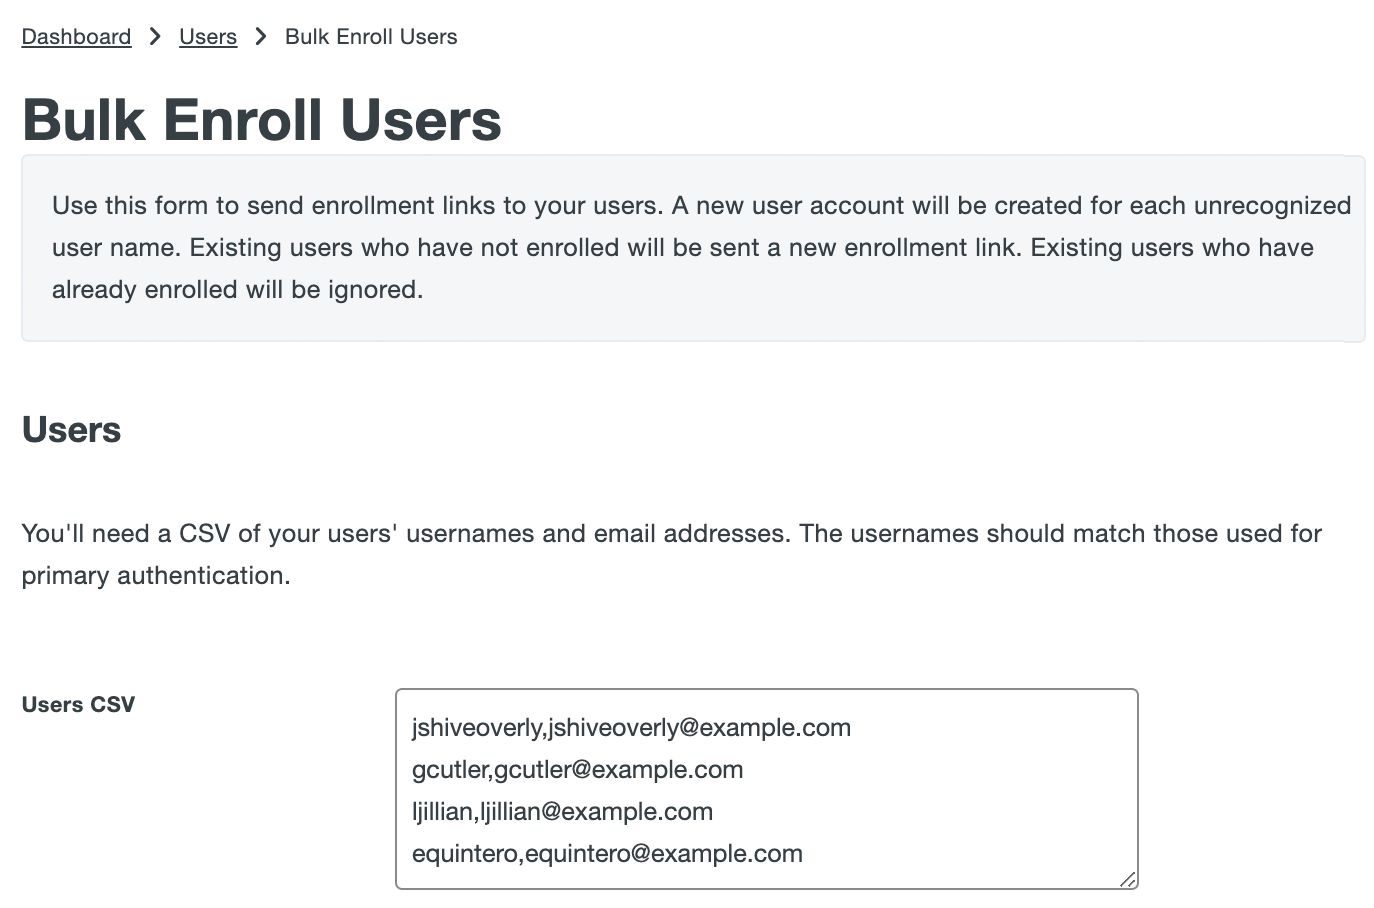
-
You now have a chance to review and customize the self-enrollment email message sent to your users. Check the box to save this custom email and subject line for future use. You can choose whether your users to see the traditional prompt or Universal Prompt by changing your "Enrollment Email" settings. When satisfied with the email message and subject line, click the Send Enrollment Links button at the bottom of the page.
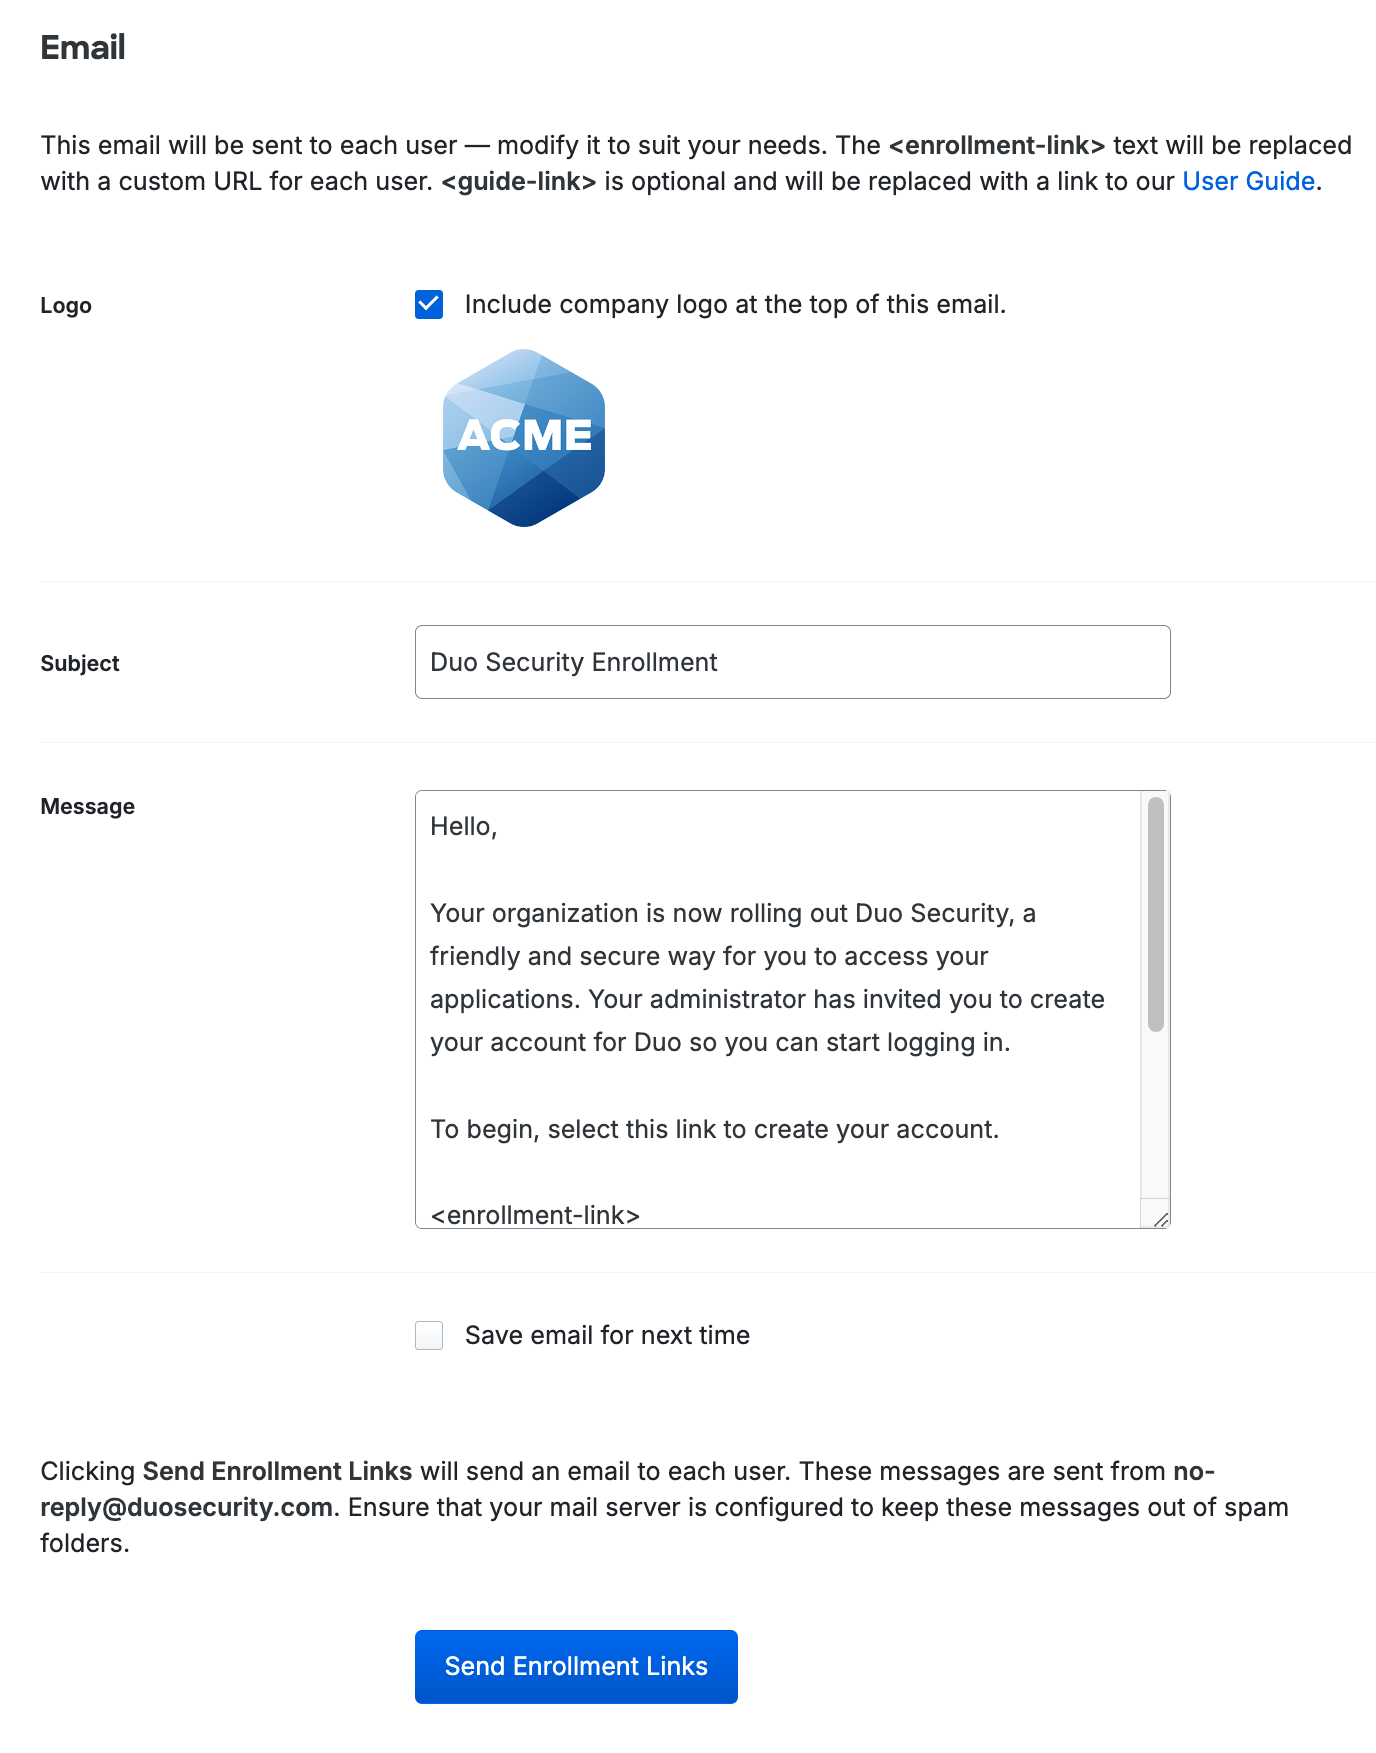
The sent message will have a non-editable header added, informing the user it's an automated message sent by Duo and to contact their organization's Duo admins or IT support group with any questions.
-
Users receive custom links via email which will allow them to complete self-enrollment. The enrollment link expires after thirty days.
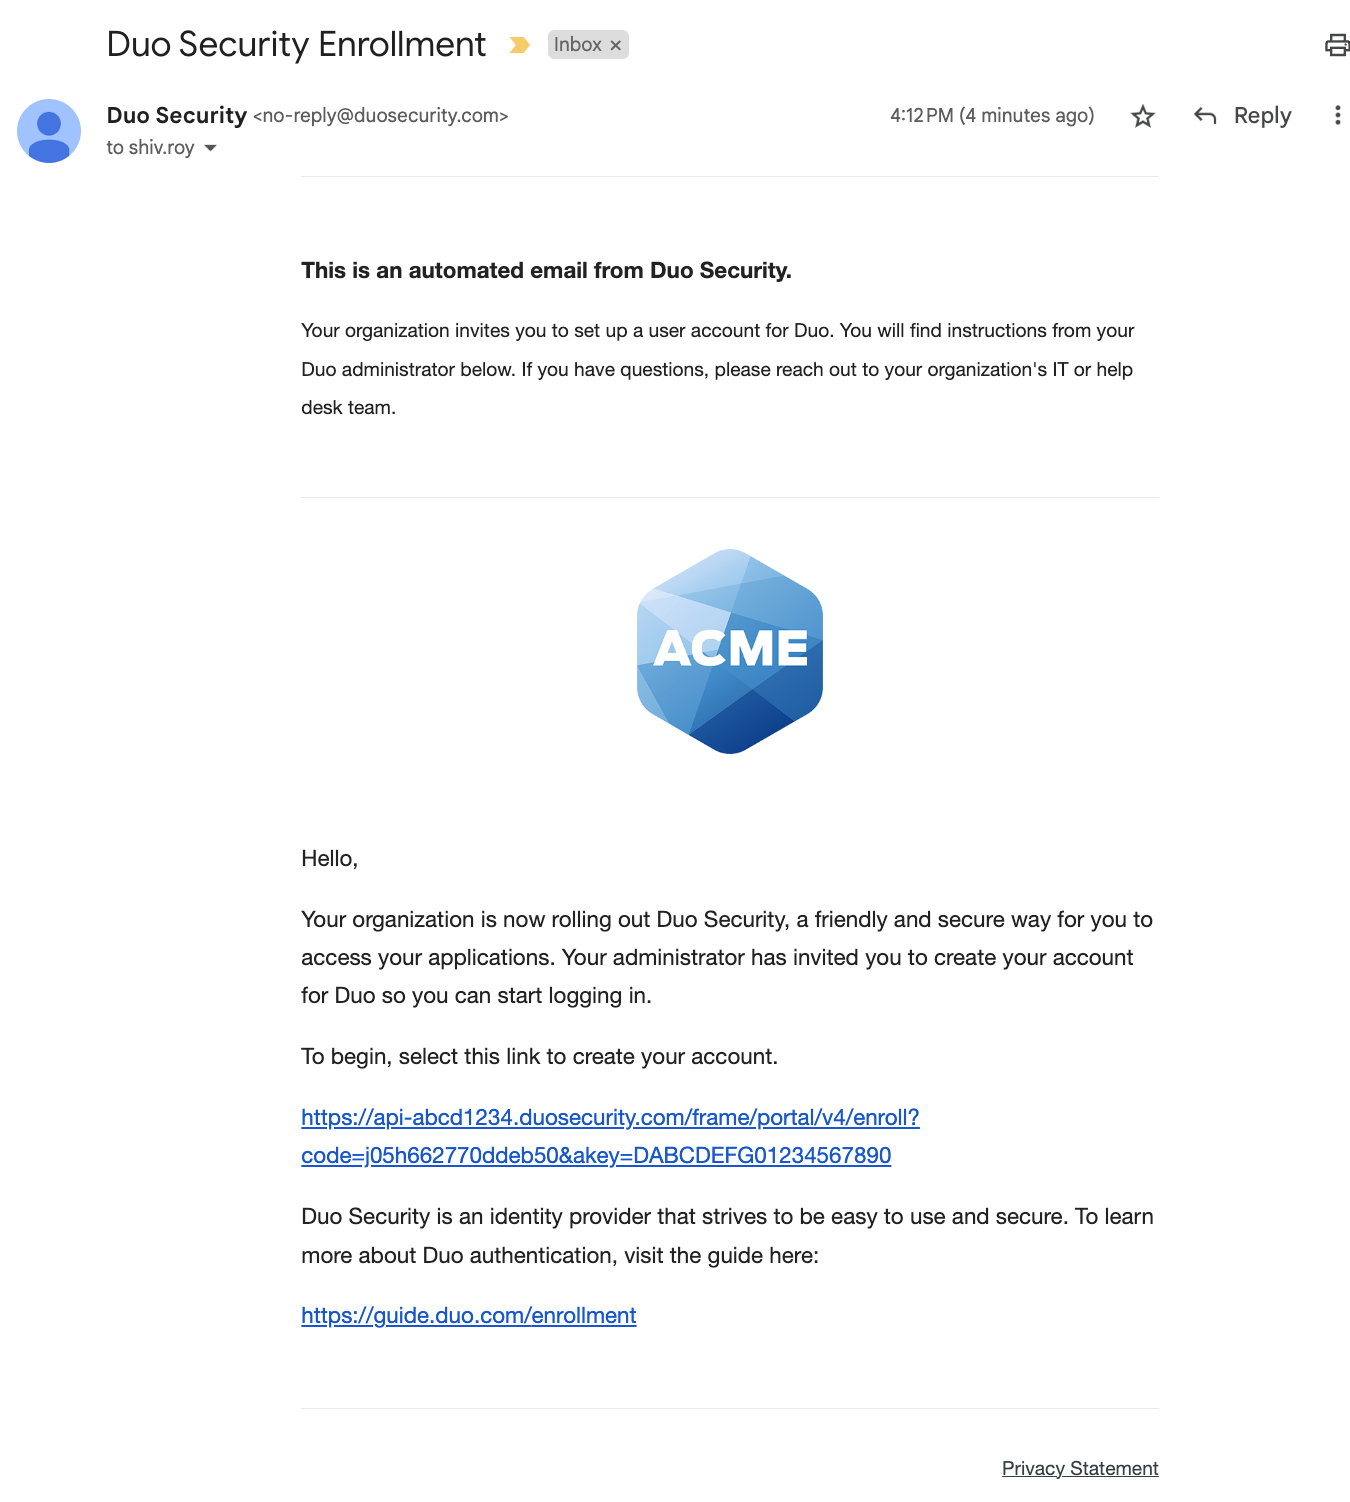
Users appear listed in the "Users" section of the Duo Admin Panel as soon as you send the enrollment link.
-
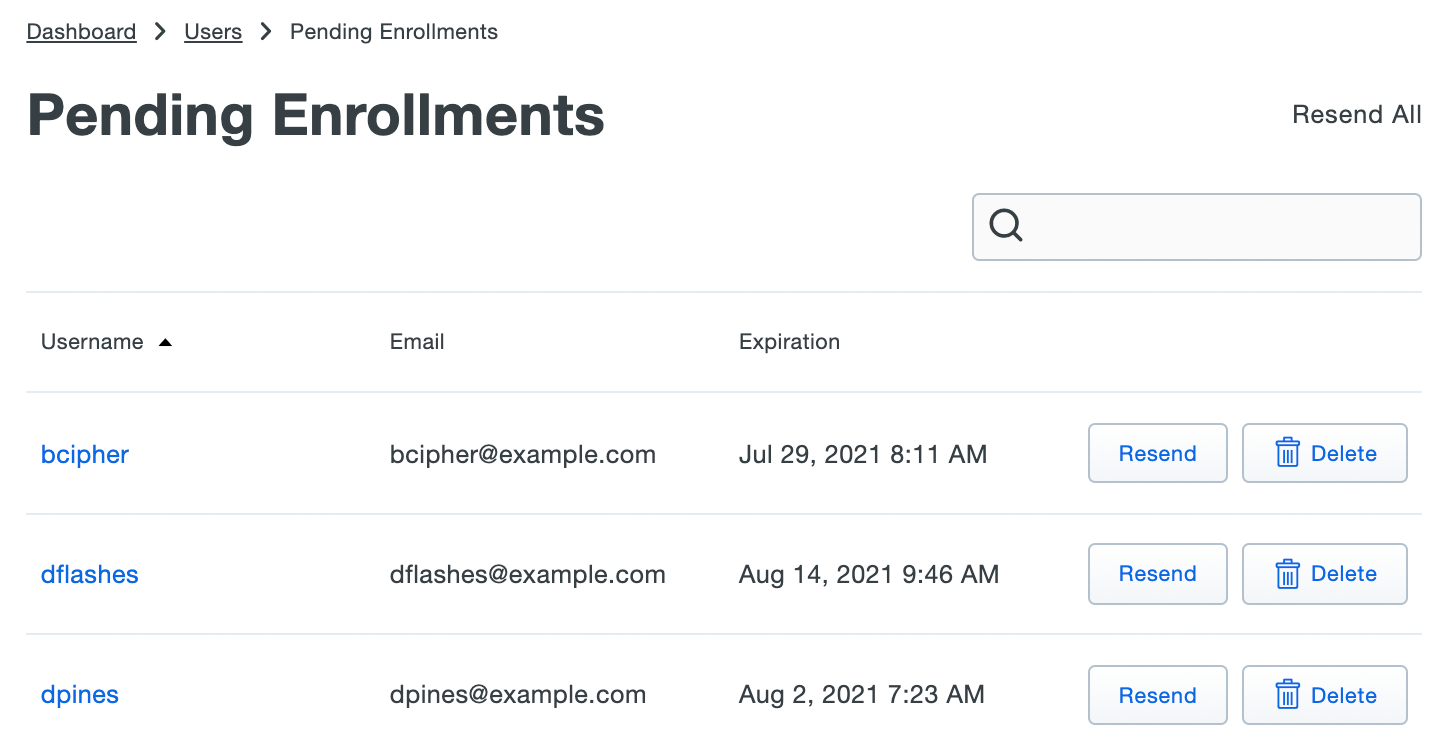
The Pending Enrollments table shows which users created by bulk enrollment or directory sync have not yet completed enrolling their 2FA devices in Duo, along with the user's email address and the expiration date for the current enrollment link.
If you need to send the user another copy of the enrollment link email, click the Resend button, or click Resend All to send the email again to all users with outstanding enrollment links. Resending the email does not change the current enrollment link's expiration date. The email message gets sent to the current email address for the user, not the address that was used when the original enrollment was sent if it's been changed since then.
Click Delete to remove a pending enrollment. Deleting a pending enrollment immediately invalidates any unexpired enrollment link previously sent to that user. The user associated with the pending enrollment remains in Duo, so you can send them a new enrollment link via email.
Manual Enrollment
Role required: Owner, Administrator, or User Manager.
Admins can add individual users and phones from the Duo Admin Panel. To add a new user manually:
-
Log into the Duo Admin Panel.
-
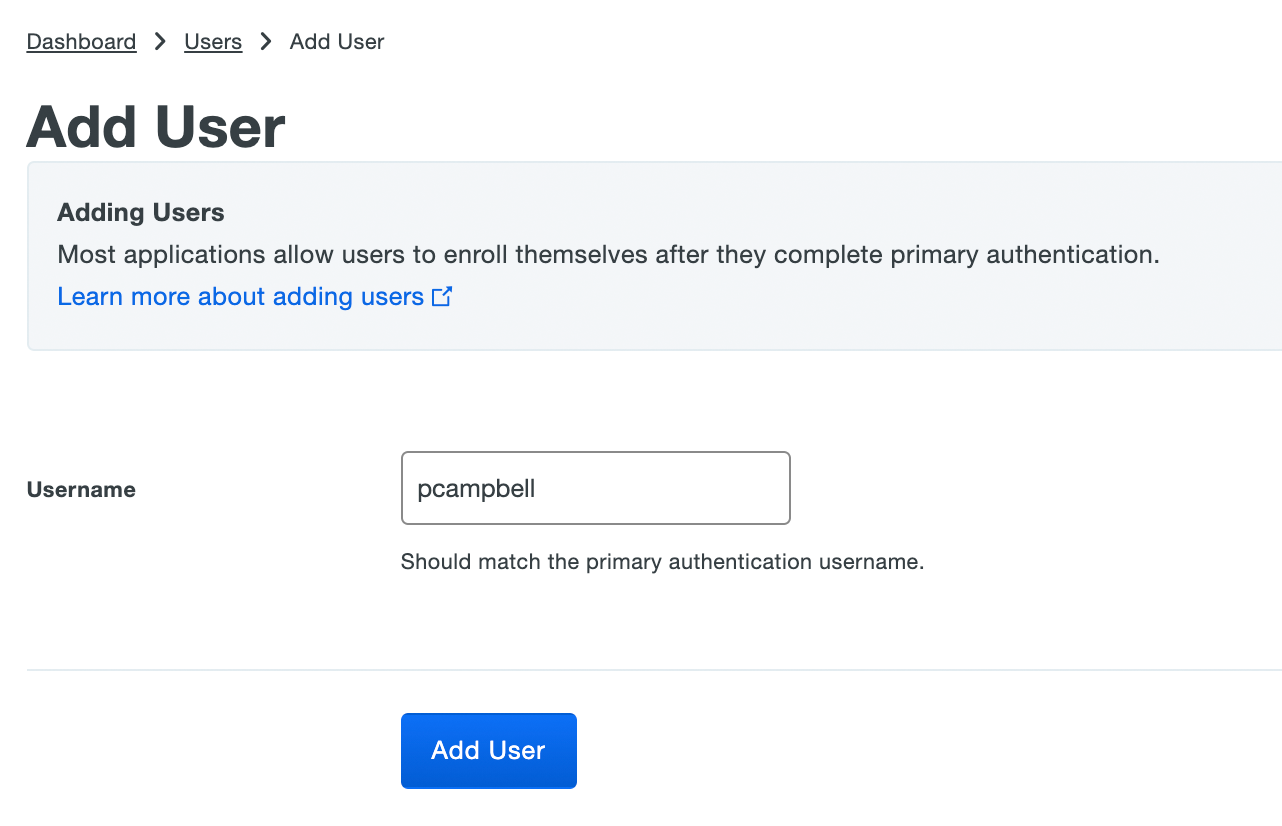
From the Dashboard page you can click the Add New... button in the top right and then click User. Otherwise, click Users in the left sidebar, then click the + Add User button or the Add User submenu item in the left sidebar.
-
Type in the username. A Duo username should match the user's primary authentication username. Duo usernames are not case-sensitive and are normalized to lowercase.
Note
To ease the integration of your systems and Duo, different application types allow for varying degrees of username normalization. Username normalization preferences are set on the properties page for each application.
-
Once the user is created you can click the Send Enrollment Email link to send your new user a message that contains a link they can use to add a phone or other 2FA authentication device.

-
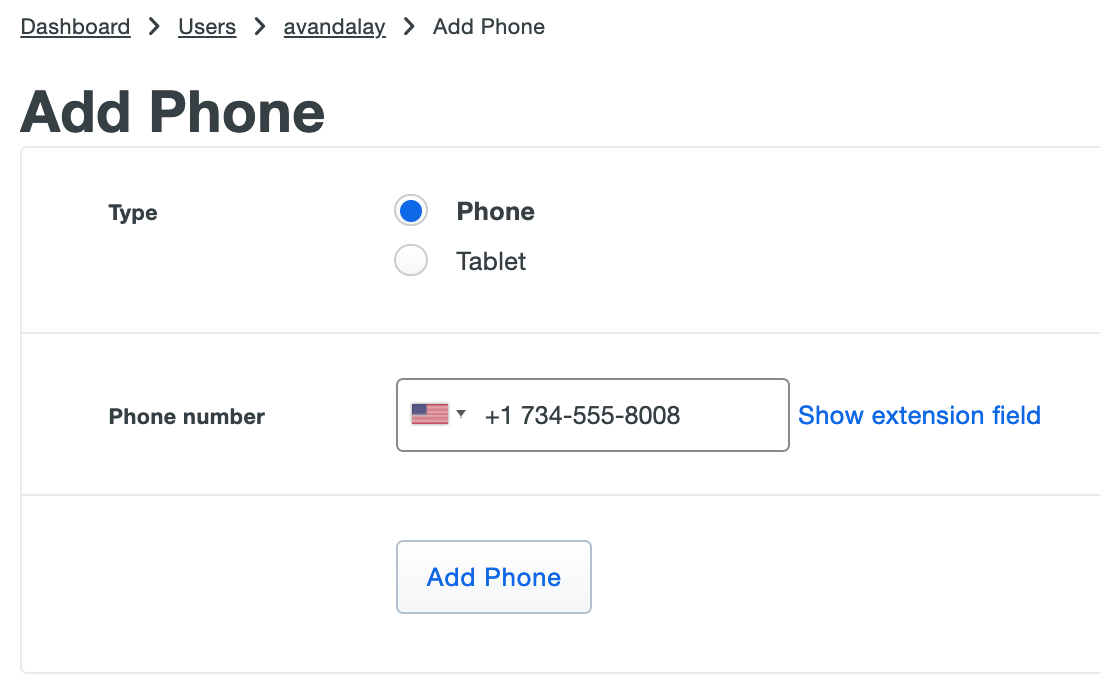
Optionally, you can add a phone to the user now. Scroll down on the new user's details page to the "Phones" table and click Add Phone.
-
Chose "Phone" or "Tablet," and type in the phone number (leave this field blank if adding a tablet). Click the Add Phone button.
-
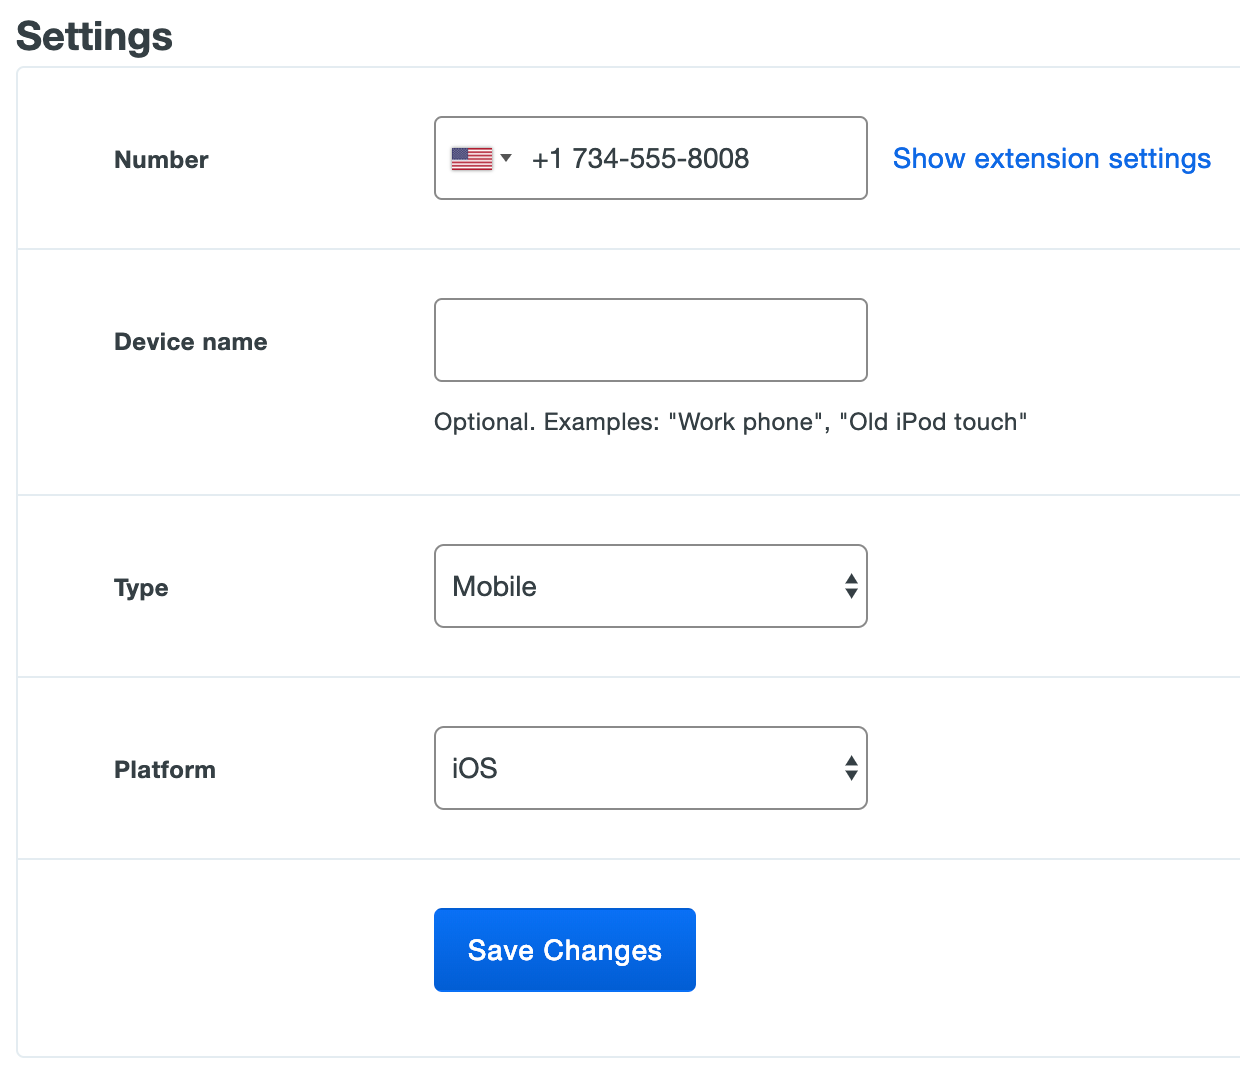
Choose the appropriate phone "Type" and "Platform" from the drop-down menus and enter a "Device name" (this field can be left blank). If you know the device is a smartphone but aren't sure exactly what the platform is, choose "Generic Smartphone" and the actual platform will be set when the user completes Duo Mobile activation. Click the Save Changes button.
-
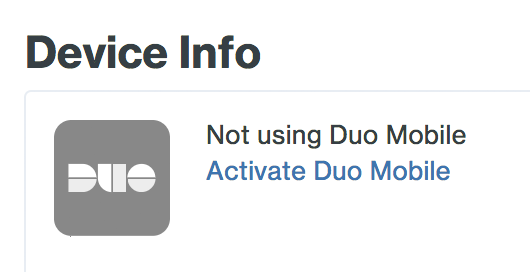
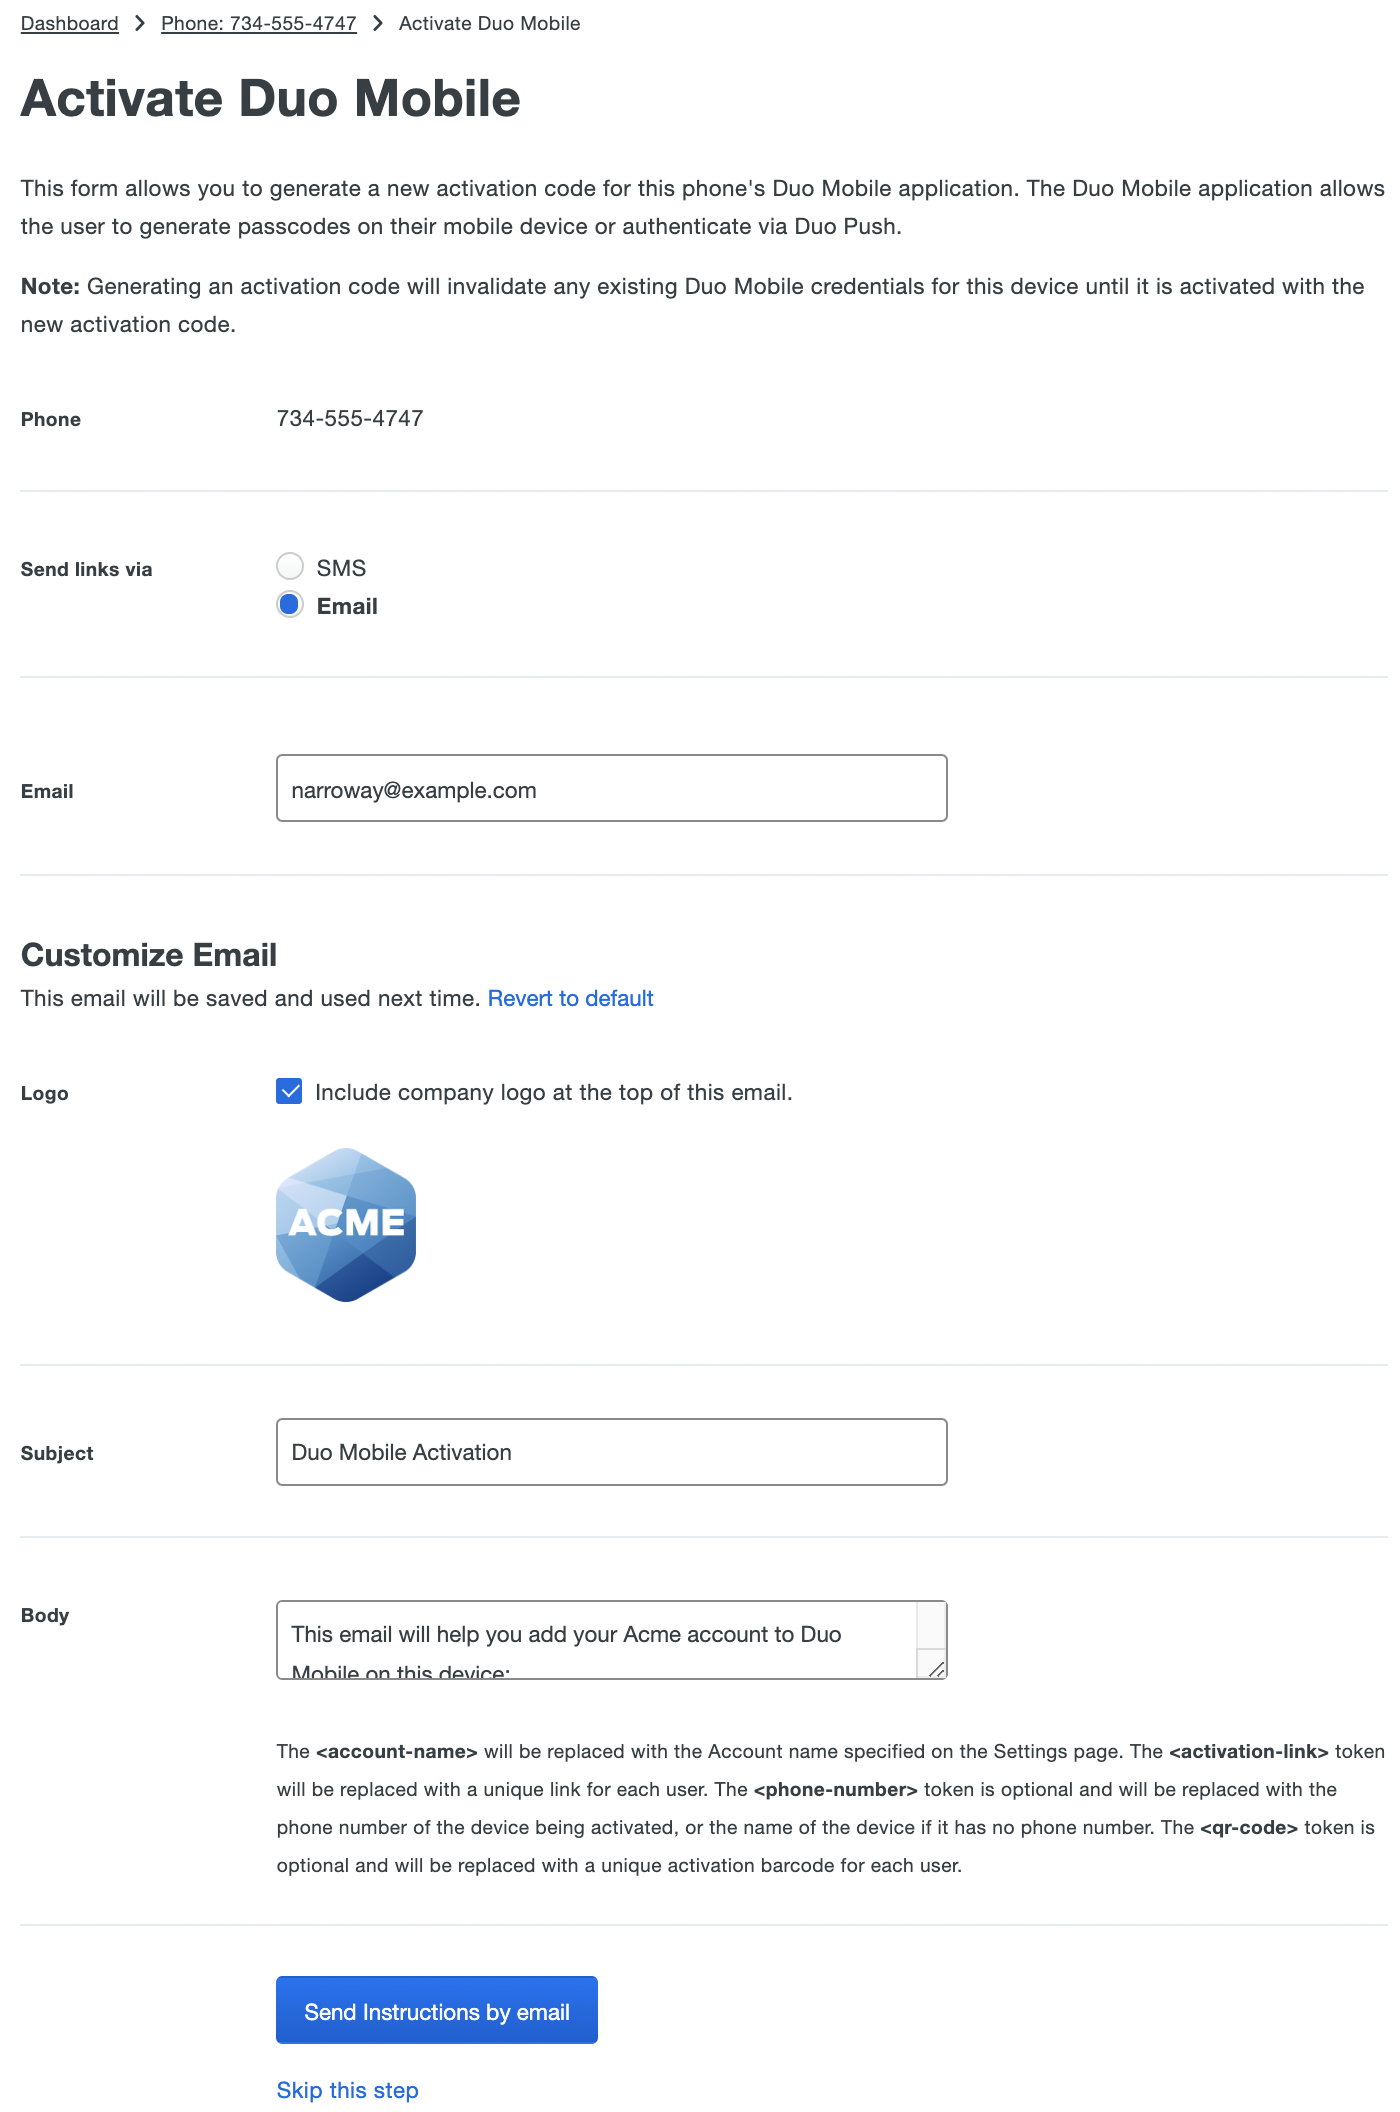
Click the Activate Duo Mobile link in the "Device Info" section. This link is only available when you set the phone type to "Mobile" and selected something other than "Unknown" as the platform.
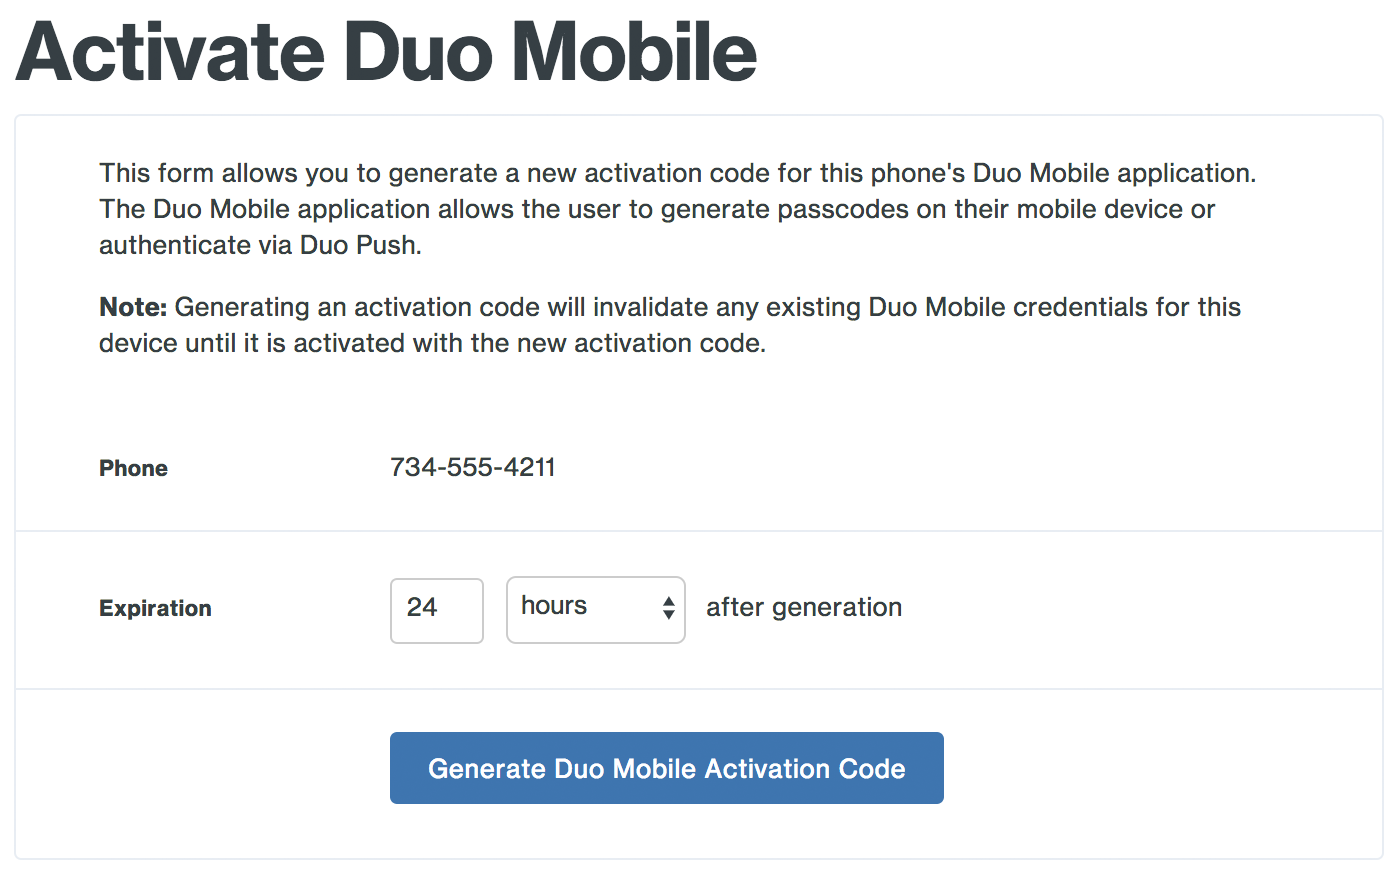
Then on the next page click the Generate Duo Mobile Activation Code button. By default, activation codes will expire after 24 hours. You can change the activation code expiration by entering a different value.
-
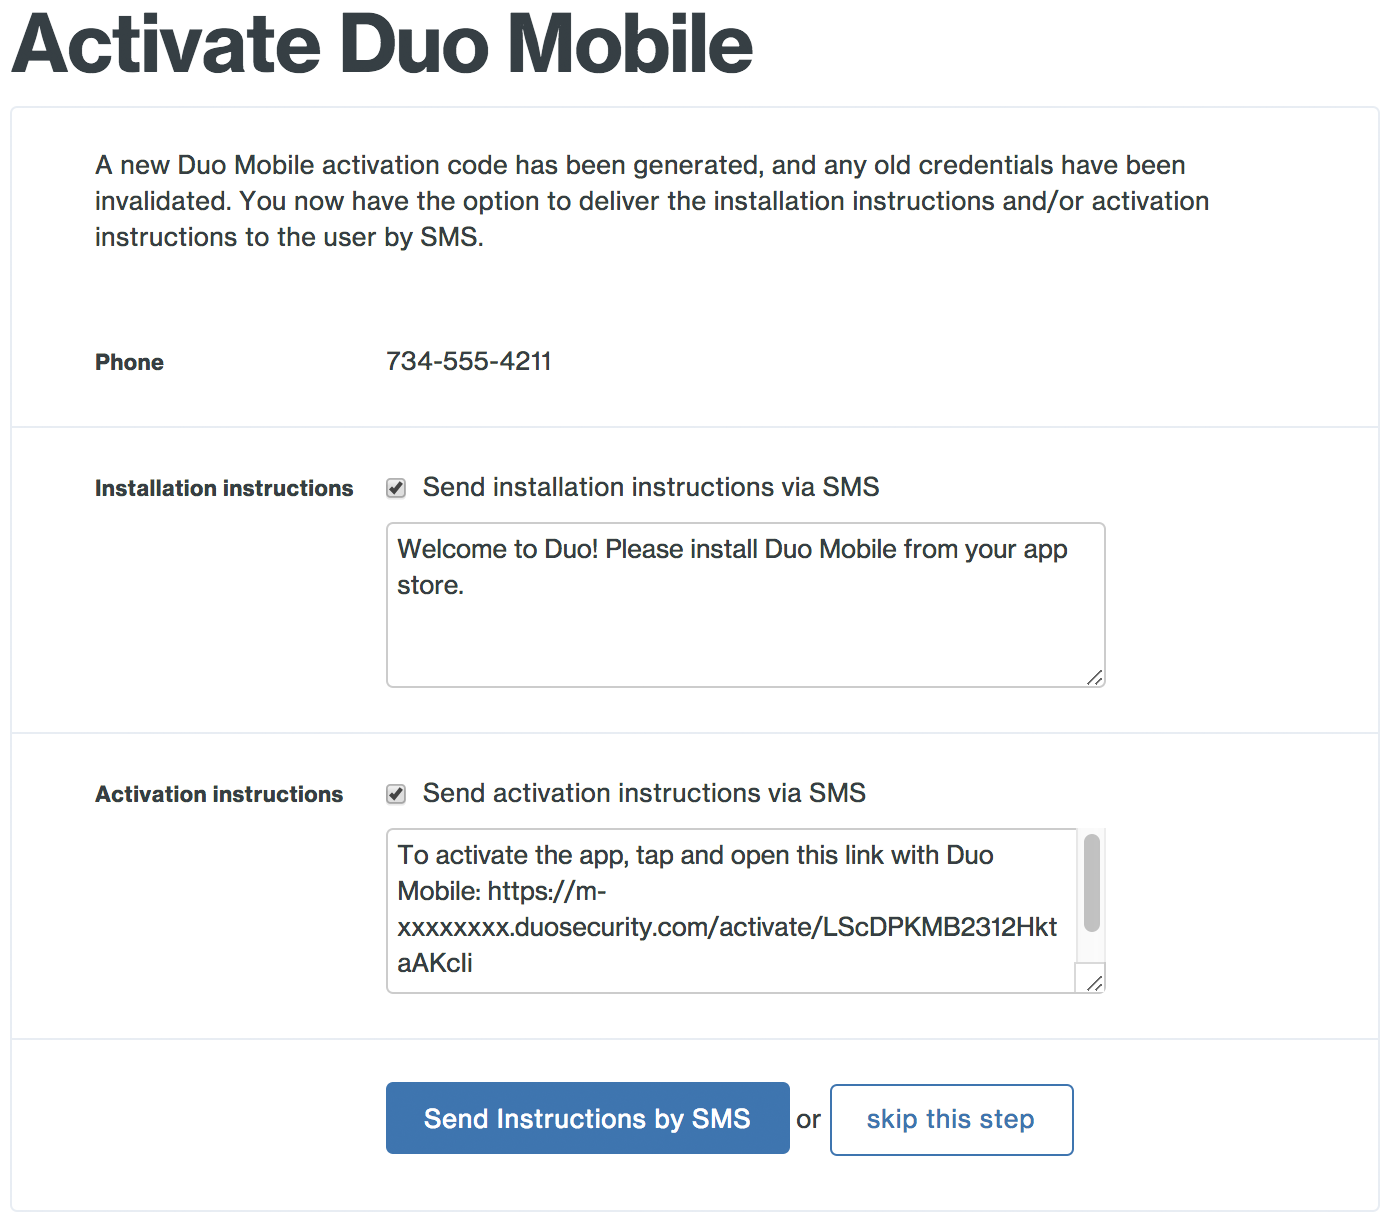
If the device you're activating is a phone (with a phone number), you'll see two text messages that you can send. The first has a link that helps the user install Duo Mobile. The second message has a code that the user can use to immediately add the account to their Duo Mobile app. Click the Send Instructions by SMS button to send the text messages to the user's phone. These instructions can also be copied and pasted into an email to the user, if that's preferable.
If the device is an iPad or Android tablet (and does not have a phone number), you'll be able to email the activation link to the user. If the Duo user has an email address set then that address will be automatically present in the Email Address field. You can change this destination email address if you need to, or enter it if the Duo user has no email address saved. You may also choose whether to include your organization's logo in the message, or modify the subject or content before clicking Send Instructions by Email.
Send Enrollment Emails to Existing Users
Role required: Owner, Administrator, User Manager, Security Analyst, or Help Desk (when permitted in the "Help Desk" global setting).
When a user already exists in Duo with an email address present in the user's details, but has yet to register any two-factor authentication devices, you can send an enrollment email to the user from the Admin Panel. If an enrollment email was already sent to the user by any method (manually by a Duo admin, automatically as part of directory sync, etc.) but the user did not receive it or deleted it without enrolling, you can resend the email.
-
Log into the Duo Admin Panel.
-
Search for the user using the search bar at the top of the page, or click Users in the left sidebar and locate the user to which you want to send or resend an enrollment email. Click through to the user's details page.
-
Click the Send Enrollment Email or Resend Enrollment Email link at the top-right of the user's details page. Note that if the user has no valid email address present in the "Email" field, you'll receive an error. Update the email information for the user (clicking Save when done) and try sending the enrollment email again.
Activating Duo Mobile After Enrollment
Role required: Owner, Administrator, User Manager, Security Analyst, or Help Desk.
You can easily send Duo Mobile activation texts or emails to users created via automatic and manual enrollment methods from the Duo Admin Panel. If your organization uses e-mail filtering, be sure to allow the sender no-reply@duosecurity.com.
-
Log into the Duo Admin Panel. Click Users in the left sidebar.
-
You'll see a notification bar at the top of the page indicating that some users who have an attached smartphone or tablet device have not yet activated Duo Mobile.

Note: A user's device must be assigned the type "Mobile" with a known device platform (i.e., any platform other than "Unknown") before that user can be sent an activation link. Users without a known platform associated with their device cannot be sent activation links. If you know that a user has a smartphone, but don't know which kind it is, choose Generic Smartphone as the device platform.
-
Click on Click here to send them activation links in the notification bar to send activation links to your remaining unactivated users. You have the option of sending the activation links to users by either SMS or email. When you choose Email then the Duo users with email addresses who are not activated and who have a smartphone device attached are shown. If you choose SMS, all unactivated users with attached smartphones are shown.
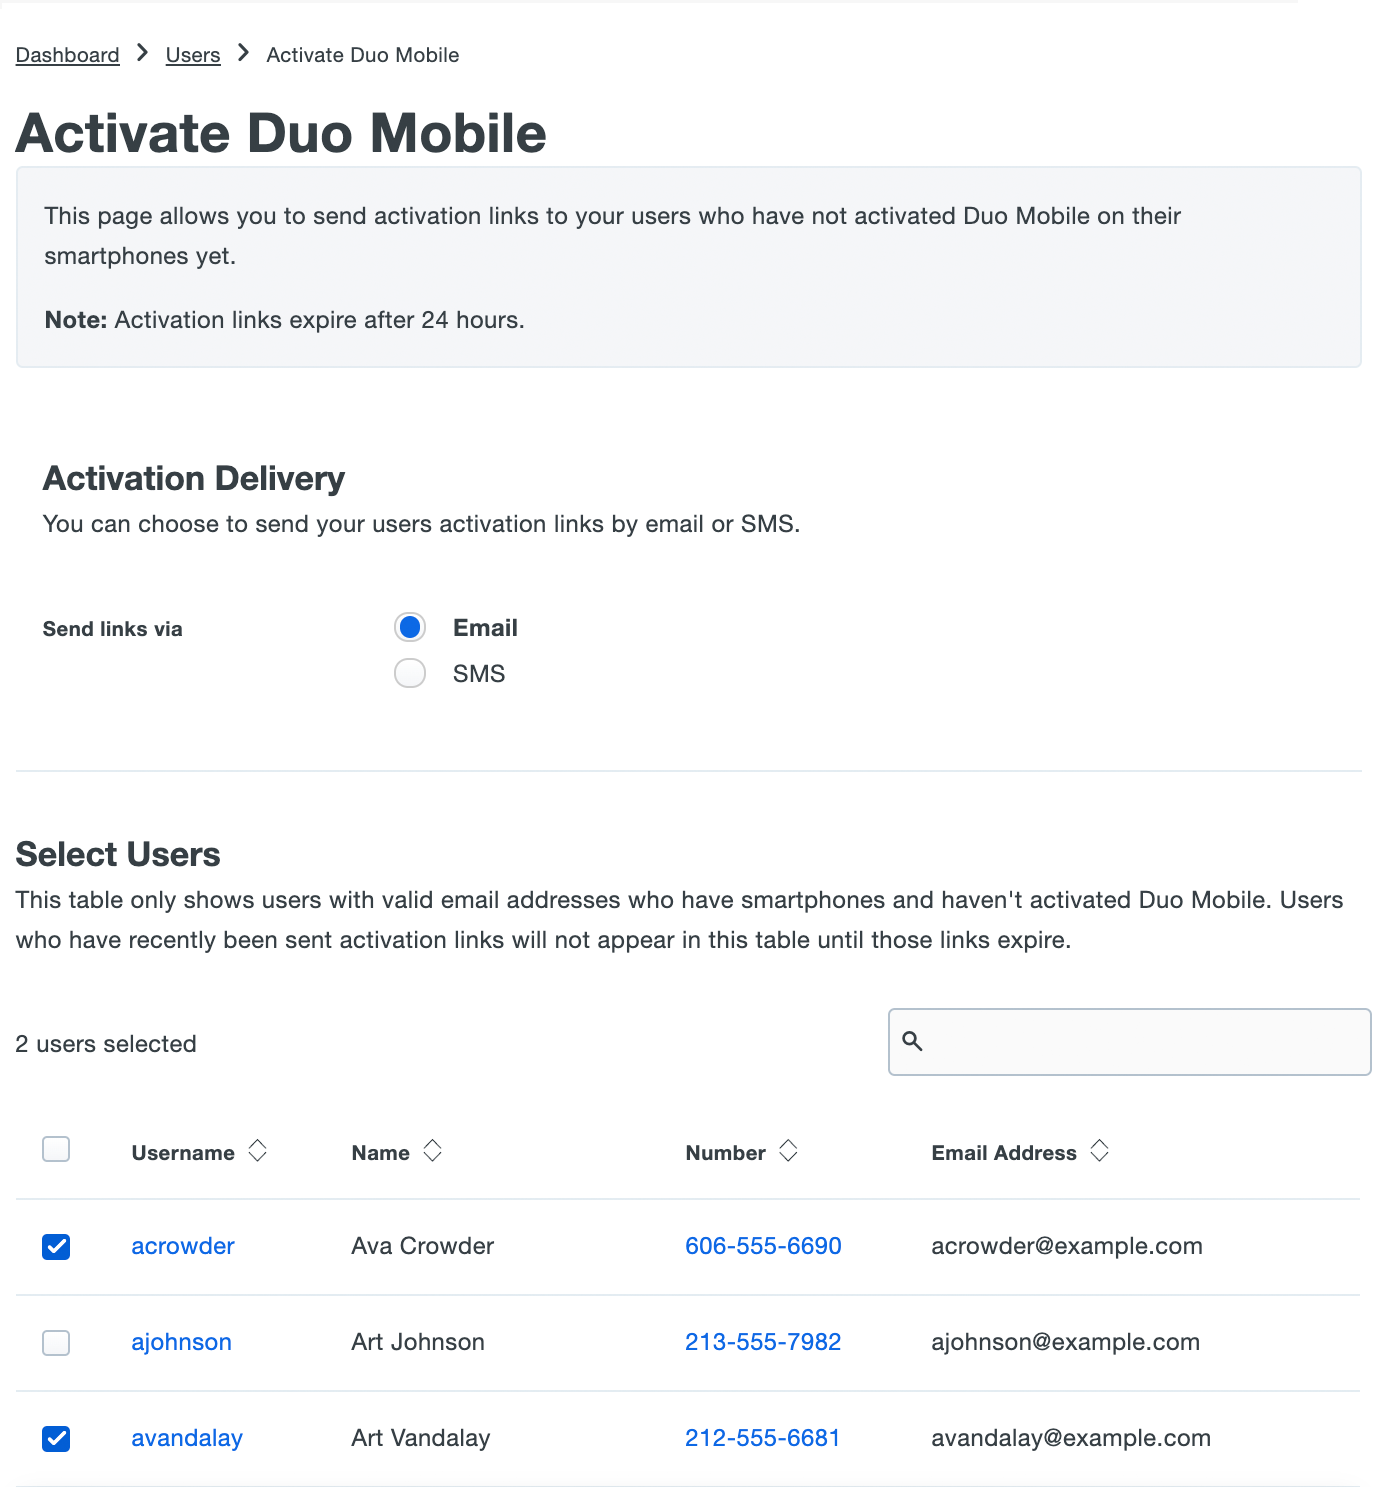
Select which users will receive activation links by checking the box next to their usernames. To select all users, check the box next to the "Username" column header.
After selecting the desired users, you can customize the message they will receive. When finished selecting users and customizing the email, click the Send Email to Selected Users button.
Note: Users who have recently been sent activation links from the Duo Admin Panel cannot be sent a new link until the existing links expire (by default, 24 hours after sending).
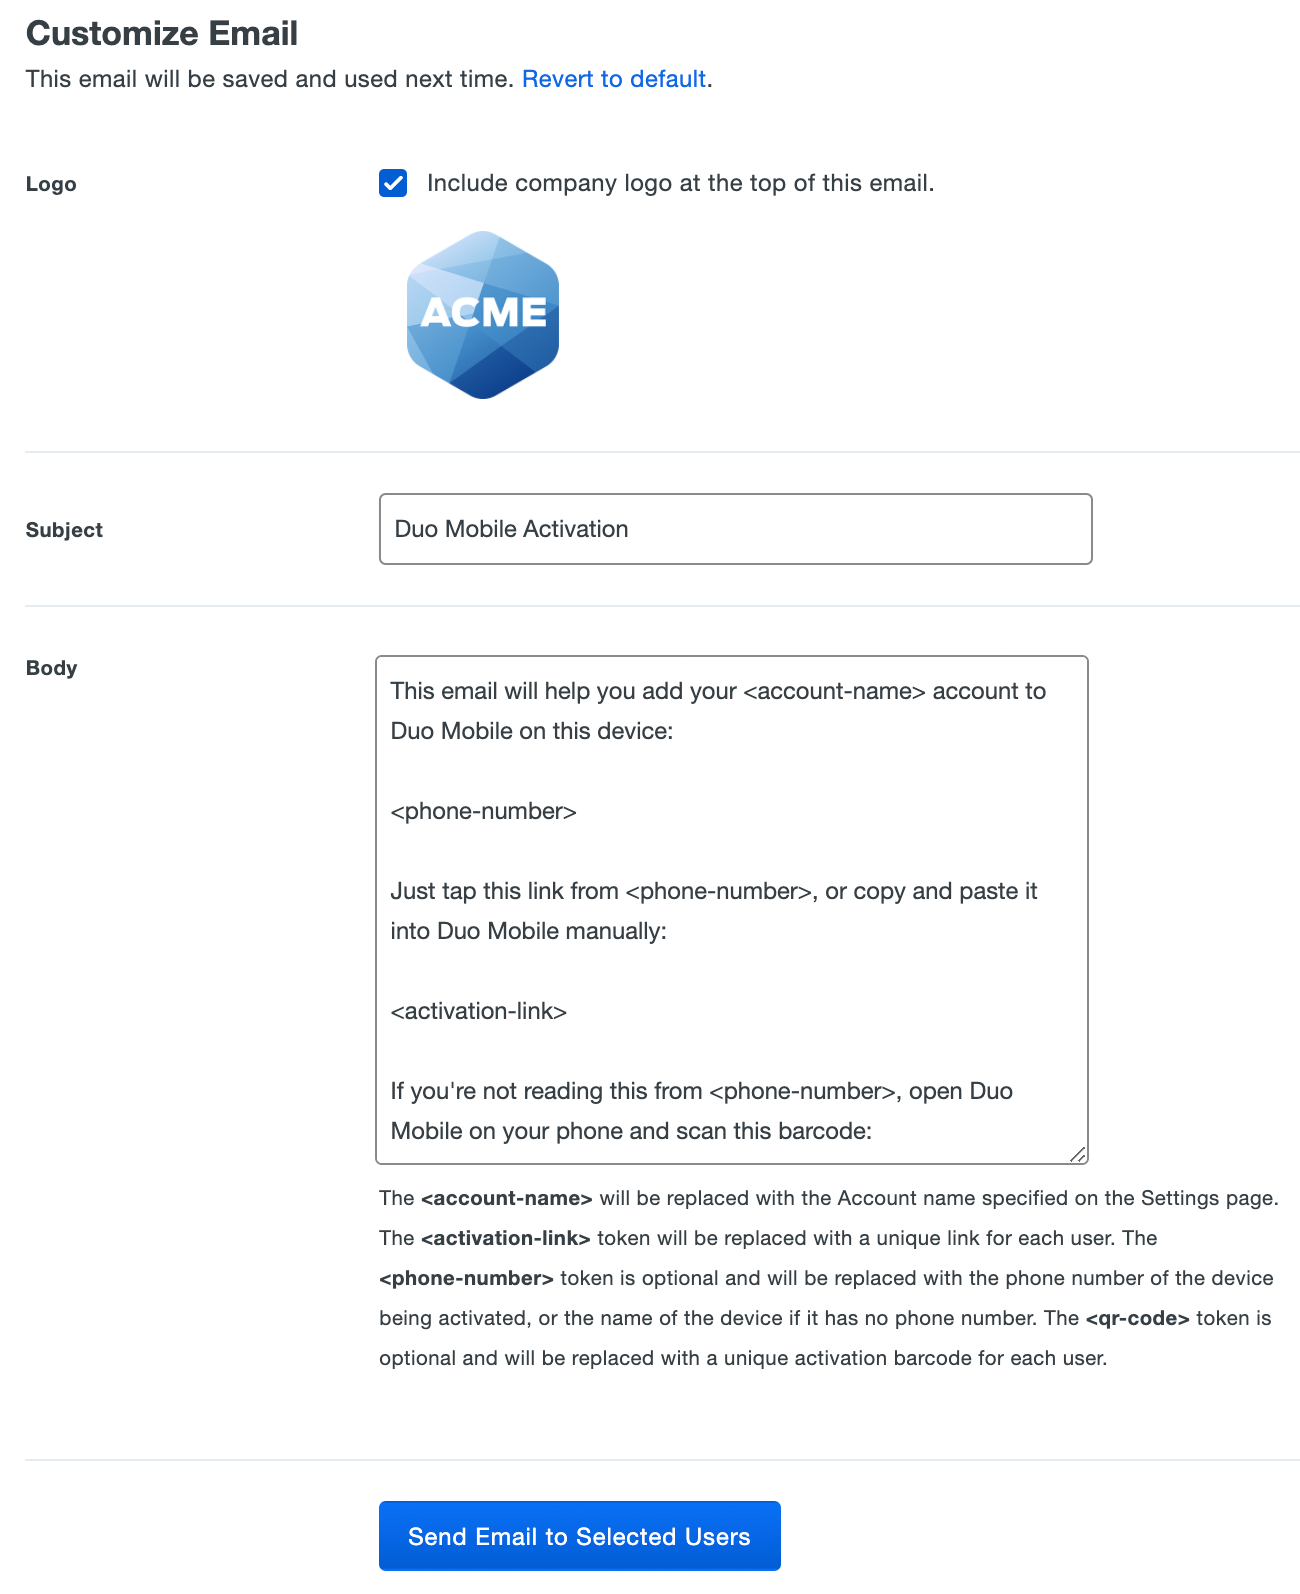
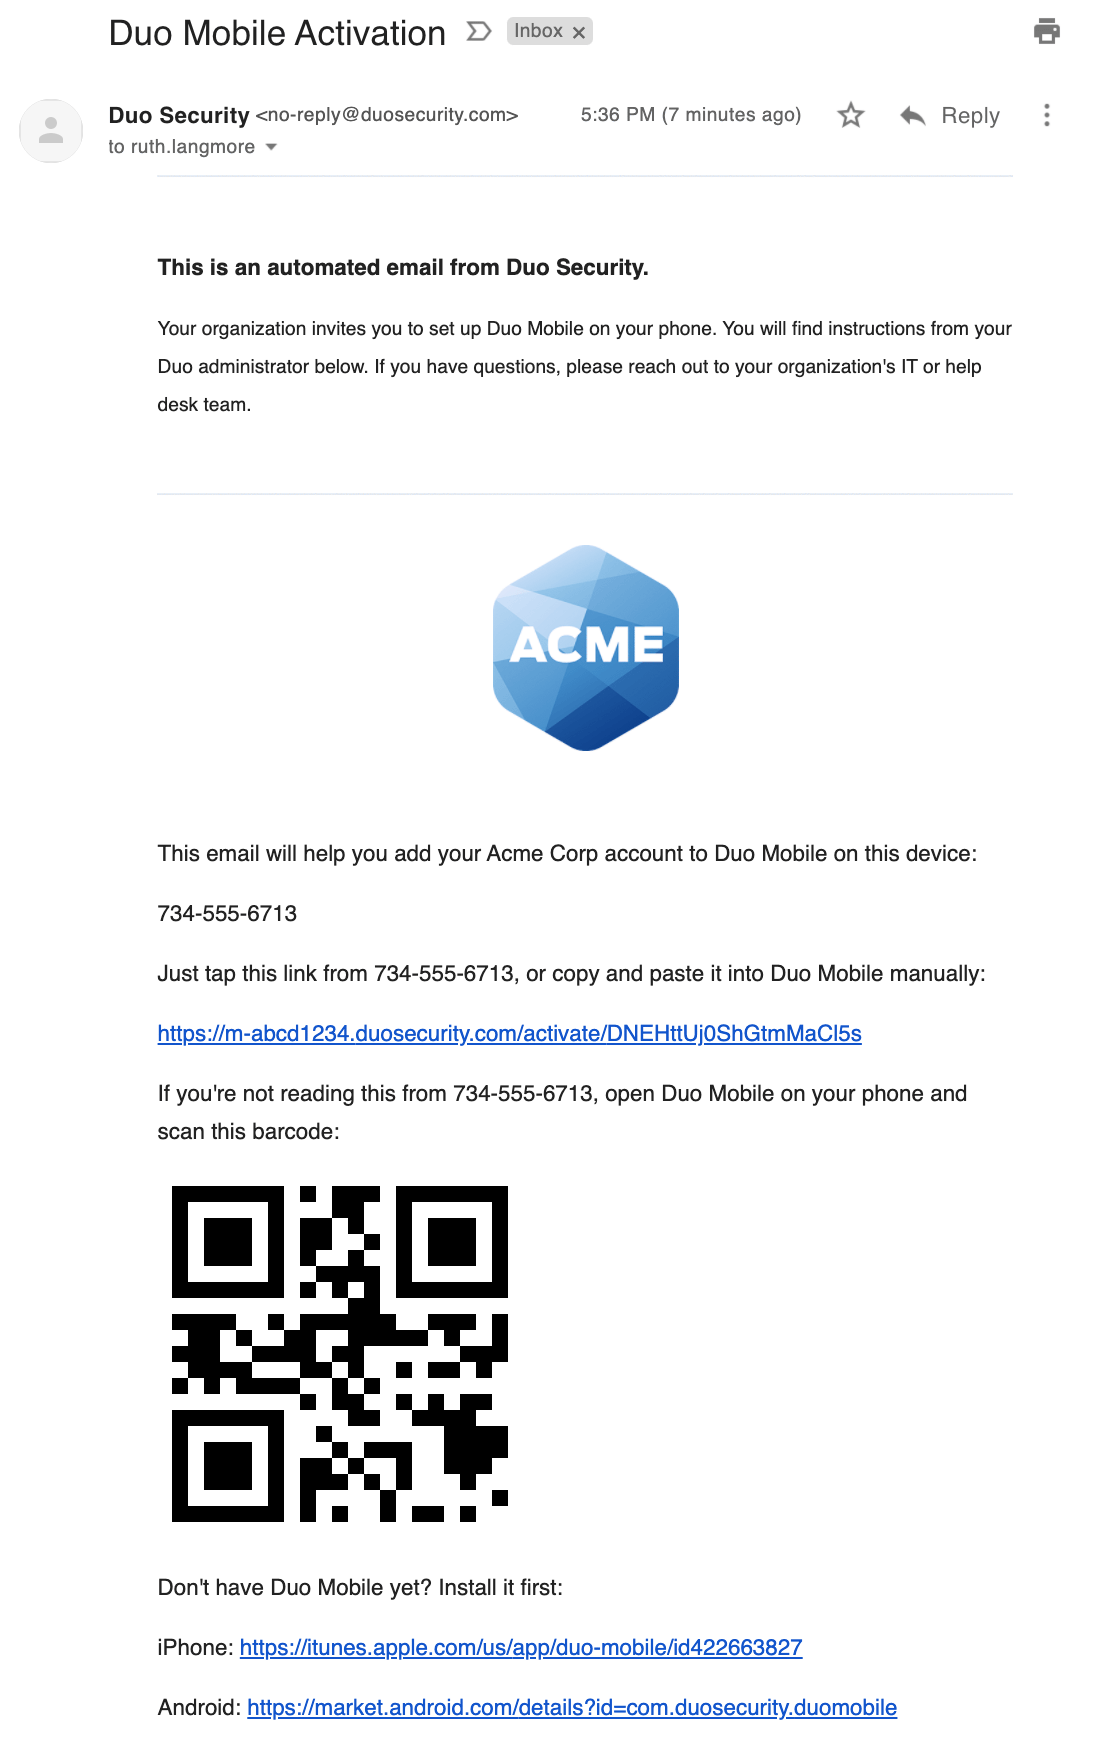
The sent message will have a non-editable header added, informing the user it's an automated message sent by Duo and to contact their organization's Duo admins or IT support group with any questions.
-
The selected users receive an SMS or email message with an activation link and QR code. Once a user opens the link on their device, or scans the QR code with the Duo Mobile app, the Duo account is added and the user is fully activated.
APIs
Advanced customers can use Duo's Admin API to programmatically create users and devices, associate users to devices, and generate Duo Mobile activation links.
Troubleshooting
Need some help? Try searching our Knowledge Base articles or Community discussions. For further assistance, contact Support.
All Duo customers have access to Level Up, our online learning platform offering courses on a variety of Duo administration topics. To access Level Up content, sign in with the same email address you use to sign in to the Duo Admin Panel.
