Documentation
Duo for NetScaler Web - OAuth with Duo Universal Prompt
Last Updated: September 18th, 2024Contents
Duo integrates with your on-premises NetScaler (formerly Citrix Gateway) to add two-factor authentication to NetScaler Gateway logins via advanced authentication policies. Duo supports inline user enrollment, self-service device management, and support for a variety of authentication methods — such as passkeys and security keys, Duo Push, or Verified Duo Push — in the Universal Prompt.
Overview
In this configuration, your NetScaler acts as an OAuth client and Duo acts as an OIDC/OAuth identity provider for two-factor authentication. After verifying a user's credentials against your primary authentication server, such as an Active Directory domain controller, your NetScaler then redirects the user to Duo's service for secondary authentication and policy verification in the interactive web-based Duo Universal Prompt.
Unlike Duo RADIUS configurations for NetScaler, there is no need to deploy any Duo software on your premises. Duo authentication via OIDC for NetScaler also does not require a Citrix Federated Authentication Services (FAS) deployment, which is necessary to deploy Duo Single Sign-On for NetScaler.
This solution supports password changes directly against your primary authentication server prior to Duo authentication.
Prerequisites
Use of Duo as an OIDC/OAuth provider for NetScaler requires the following:
- NetScaler Advanced or Premium licensing. Verify your NetScaler license before continuing.
- Premium licenses were called Platinum licenses in some older NetScaler versions.
- NetScaler firmware 14.1-29.63 or newer.
- A working NetScaler virtual server authenticating against your preferred primary authentication server, typically an LDAP server action pointing to an Active Directory domain controller or LDAP directory server.
If you do not have the necessary NetScaler product license, or you cannot update your NetScaler software to a supported version, another option for Duo Universal Prompt support is to configure Duo Single Sign-On for NetScaler (requires a Citrix Federated Authentication Service (FAS) deployment).
If you cannot make use of either Duo as an OAuth provider or Duo Single Sign-On in your organization's NetScaler deployment, try Duo RADIUS Challenge Text Prompt for NetScaler nFactor which offers a text-based Duo prompt.
Learn more about the differences between Duo's NetScaler deployment configurations.
First Steps
- Sign up for a Duo account.
- Log in to the Duo Admin Panel and navigate to Applications.
-
Click Protect an Application and locate the entry for NetScaler Web in the applications list. Click Protect to the far-right to configure the application. and get your Client ID, Client secret, and API hostname. You'll need this information to complete your setup. See Protecting Applications for more information about protecting applications in Duo and additional application options.
Previously, the Client ID was called the "Integration key" and the Client secret was called the "Secret key".
This application communicates with Duo's service on SSL TCP port 443.
Firewall configurations that restrict outbound access to Duo's service with rules using destination IP addresses or IP address ranges aren't recommended, since these may change over time to maintain our service's high availability. If your organization requires IP-based rules, please review Duo Knowledge Base article 1337.
Effective June 30, 2023, Duo no longer supports TLS 1.0 or 1.1 connections or insecure TLS/SSL cipher suites. See Duo Knowledge Base article 7546 for additional guidance.
Duo Universal Prompt
The Duo Universal Prompt provides a simplified and accessible Duo login experience for web-based applications, offering a redesigned visual interface with security and usability enhancements.
| Universal Prompt | Traditional Prompt |
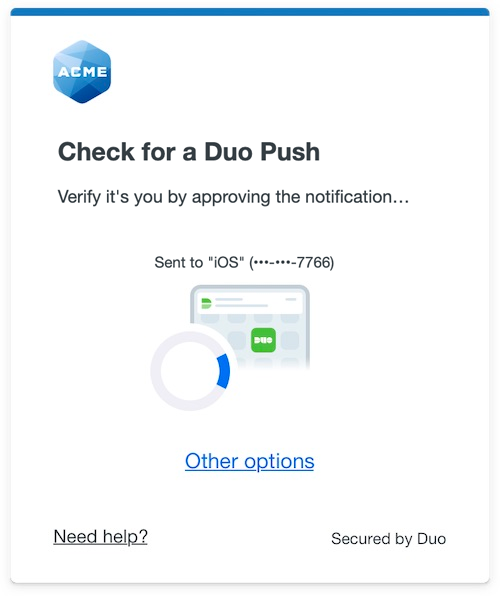 |
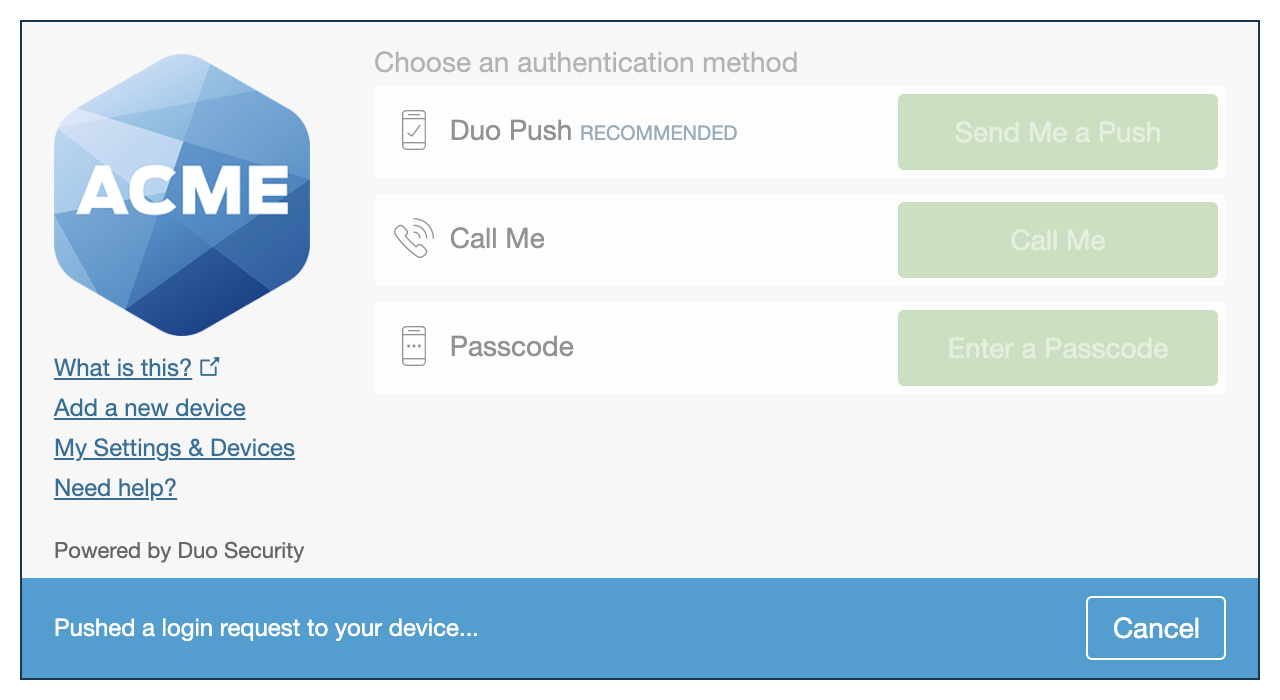 |
The Duo NetScaler Web application supports the Universal Prompt by default, so there's no additional action required on your part to start using the newest authentication experience.
Activate Universal Prompt
Activation of the Universal Prompt is a per-application change. Activating it for one application does not change the login experience for your other Duo applications. Universal Prompt is already activated for new NetScaler Web applications at creation.
The "Universal Prompt" area of the application details page shows that this application's status is "Activation complete", with these activation control options:
- Show traditional prompt: Your users experience Duo's traditional prompt via redirect when logging in to this application.
- Show new Universal Prompt: (Default) Your users experience the Universal Prompt via redirect when logging in to this application.
The application's Universal Prompt status shows "Activation complete" both here and on the Universal Prompt Update Progress report.
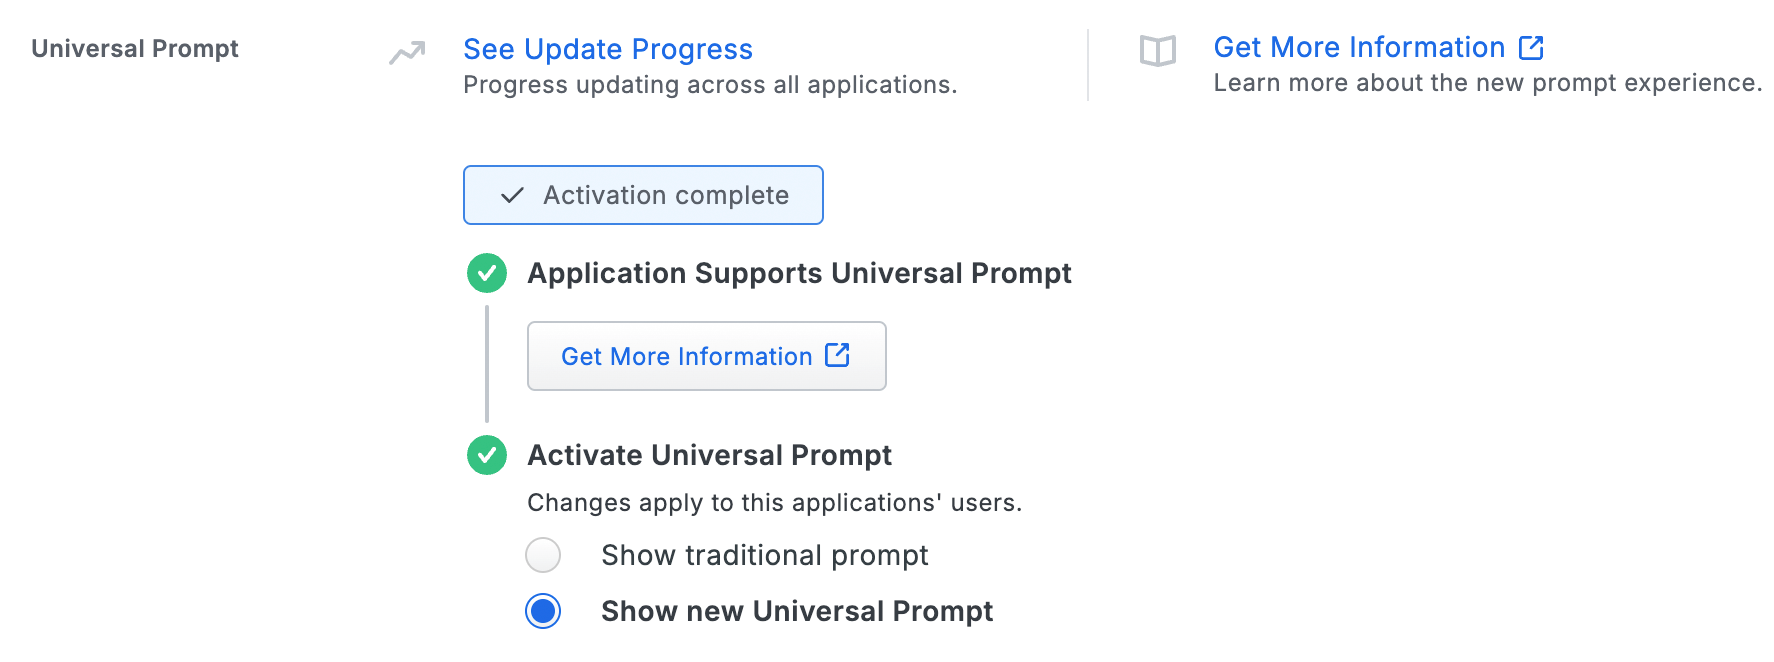
For the time being, you may change this setting to Show traditional prompt to use the legacy experience. Keep in mind that support for the traditional Duo prompt ended for the majority of applications in March 2024. This option will be removed in the future.
Universal Update Progress
Click the See Update Progress link to view the Universal Prompt Update Progress report. This report shows the update availability and migration progress for all your Duo applications. You can also activate the new prompt experience for multiple supported applications from the report page instead of visiting the individual details pages for each application.
Migration from Duo Authentication Proxy Solutions to Duo OAuth
If you currently protect your NetScaler logins with a Duo RADIUS or LDAP configuration featuring primary authentication at the Duo Authentication Proxy, please update your NetScaler authentication policies so that primary authentication requests route directly to your AD domain controller, LDAP directory server, or RADIUS server instead of passing through the Duo proxy.
If you had the Duo Authentication Proxy configured to handle both primary and secondary authentication with a single RADIUS server action and ad_client, then you will need to create a new NetScaler LDAP action pointing directly to your primary Active Directory domain controller or LDAP server before continuing.
-
Log in to the NetScaler GUI as an administrator.
-
Navigate to Security → AAA - Application Traffic → Policies → Authentication → Advanced Policies → Actions → LDAP.
-
Click Add.
-
Enter the information for your AD or LDAP directory server, such as the hostname or IP, base DN, bind DN and password, etc.
-
Save the new LDAP server action and verify connectivity before continuing.
Learn more about configuring LDAP authentication in the NetScaler documentation.
Configure your NetScaler for Duo
Create a Duo OAuth Action
Create an OAuth server action for Duo using information from the Duo Admin Panel. Verify that you have command line interface (CLI) access to your NetScaler before continuing.
-
Connect to the NetScaler CLI via SSH or console port as an administrator.
-
Issue the following command, substituting information from your NetScaler Web application's details shown in the Duo Admin Panel as follows:
YOUR-DUO-API-HOSTNAMEYour API hostname (i.e.
api-XXXXXXXX.duosecurity.com).YOUR-DUO-CLIENT-IDYour Client ID.
YOUR-DUO-CLIENT-SECRETYour Client secret.
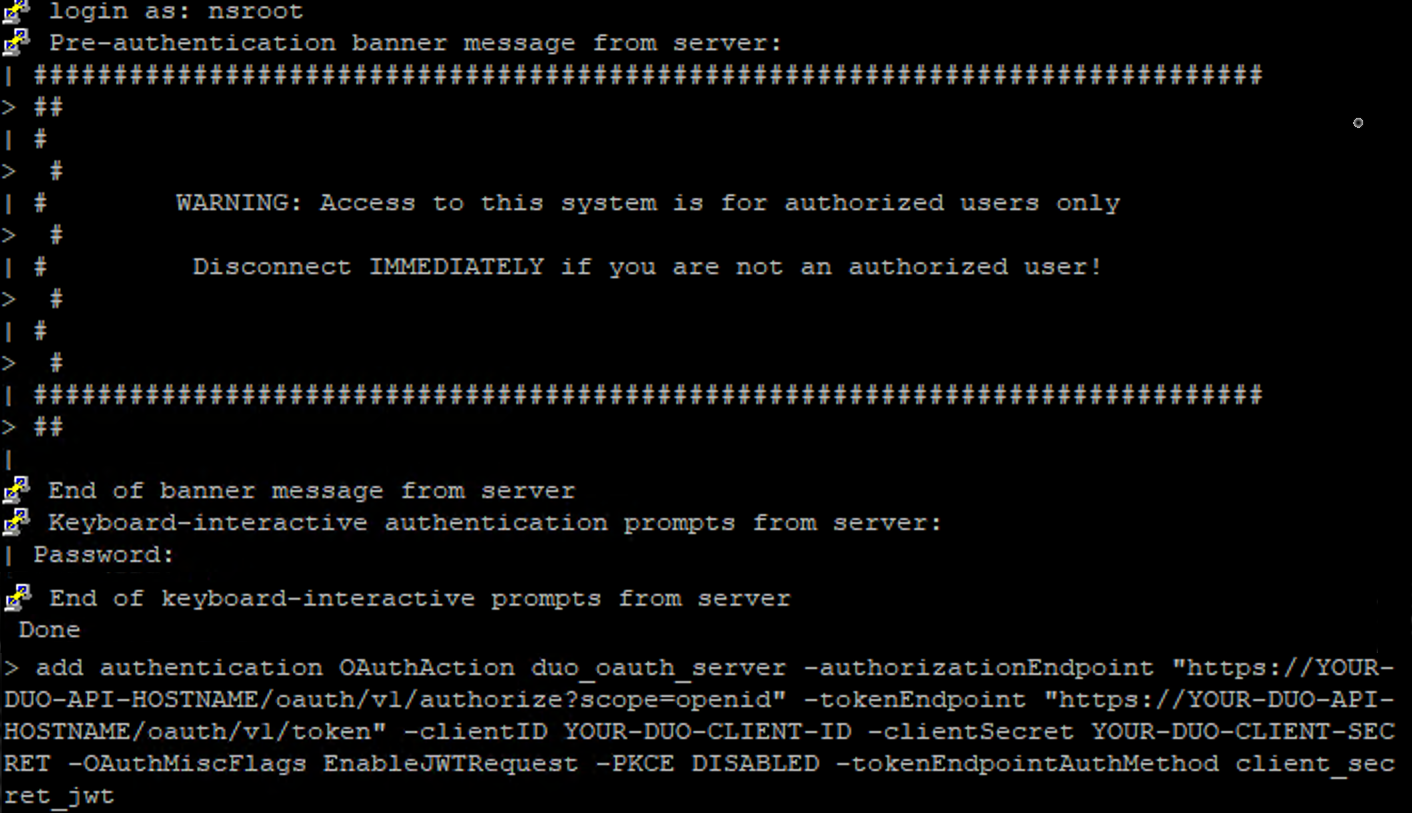
add authentication OAuthAction duo_oauth_server -authorizationEndpoint "https://YOUR-DUO-API-HOSTNAME/oauth/v1/authorize\?scope=openid" -tokenEndpoint "https://YOUR-DUO-API-HOSTNAME/oauth/v1/token" -clientID YOUR-DUO-CLIENT-ID -clientSecret YOUR-DUO-CLIENT-SECRET -OAuthMiscFlags EnableJWTRequest -tokenEndpointAuthMethod client_secret_jwt -PKCE disabled
Example CLI command in Putty SSH session
Licensing Note
If you receive the response "ERROR: This feature needs enterprise or platinum license." after issuing this command, your NetScaler does not meet the licensing requirement for this solution. Do not proceed with the rest of the steps in this document until you upgrade to NetScaler Advanced or Premium licensing (at additional cost).
If you are unable to upgrade your NetScaler license, deploy either the SAML or RADIUS alternate Duo NetScaler solution mentioned above.
Create an Authentication Virtual Server
-
Log in to the NetScaler GUI as an administrator.
-
Navigate to Security → AAA - Application Traffic → Virtual Servers in the left panel of the NetScaler GUI.
-
Click Add.
-
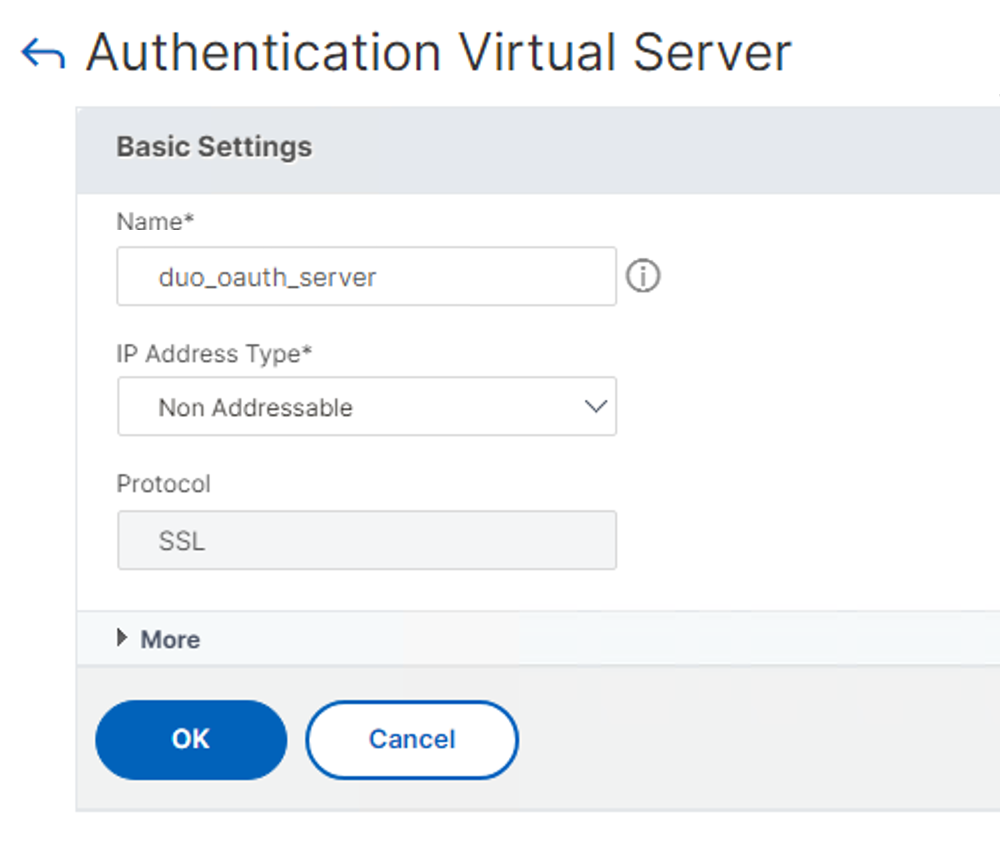
Enter a name for the new Duo virtual server.
-
Select Non Addressable as your "IP Address Type" and click OK.
-
Choose or import the server certificate for this virtual server and click Bind. This certificate will be used for SSL/HTTPS connections to the virtual server.
-
Click Continue.
Create an Authentication Policy
-
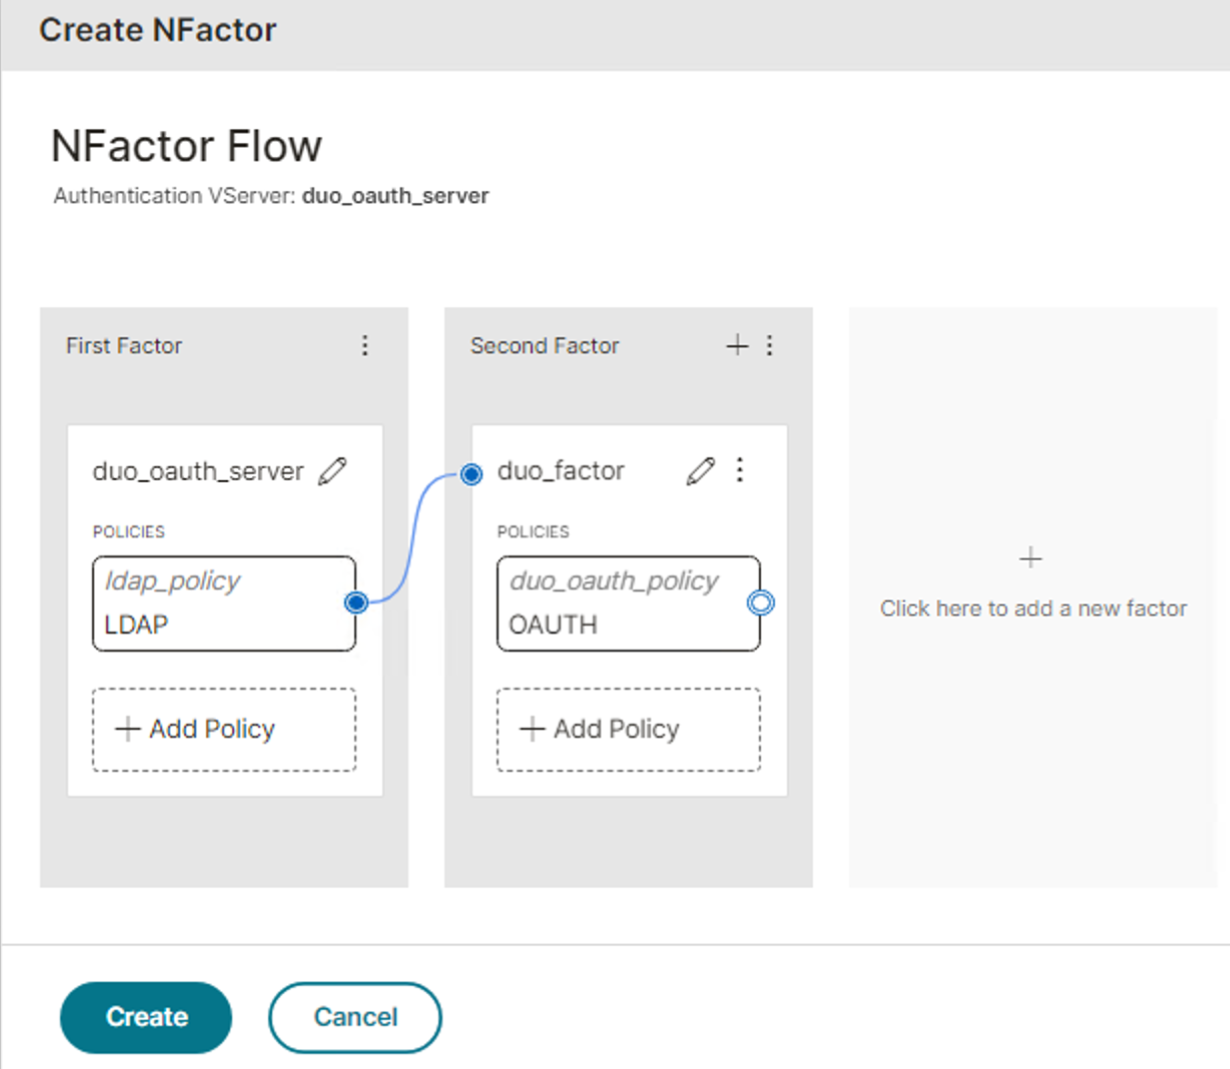
With the new Duo authentication virtual server's properties still open, click No Authentication Policy to open the nFactor Flow visualizer.
-
In the "First Factor" column of the visualizer, click on Add Policy underneath the new virtual server name and select LDAP as the policy type.
-
Click in the next column to add a new factor. In the "Second Factor" column that appears, click the plus sign icon to add a new factor for Duo ("Factor 1"). Then click the pencil icon to edit that new second factor.
-
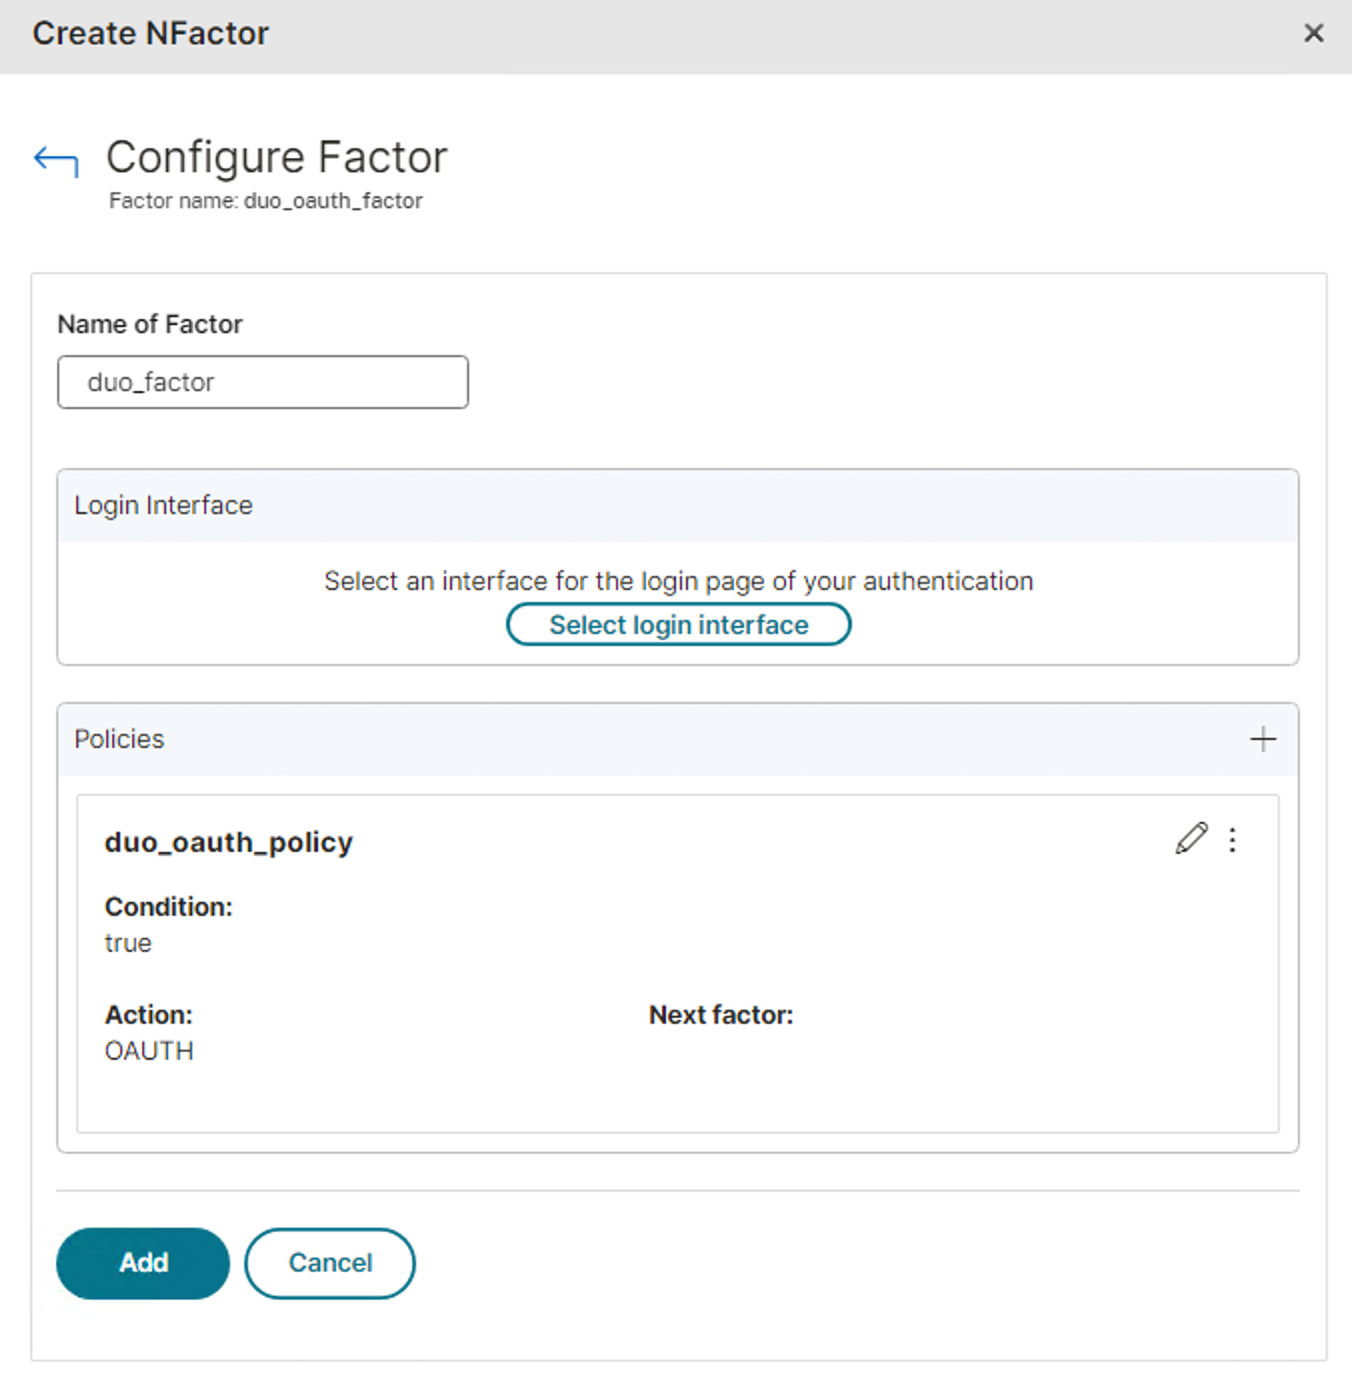
Enter a name for the new Duo factor and click Add.
-
Click on Add Policy underneath the new Duo second factor name and select OAUTH as the policy type.
-
Click on the pencil icon in the "First Factor" column to edit the first LDAP factor.
-
Click the pencil icon in the "Policies" section to open the policy editor.
-
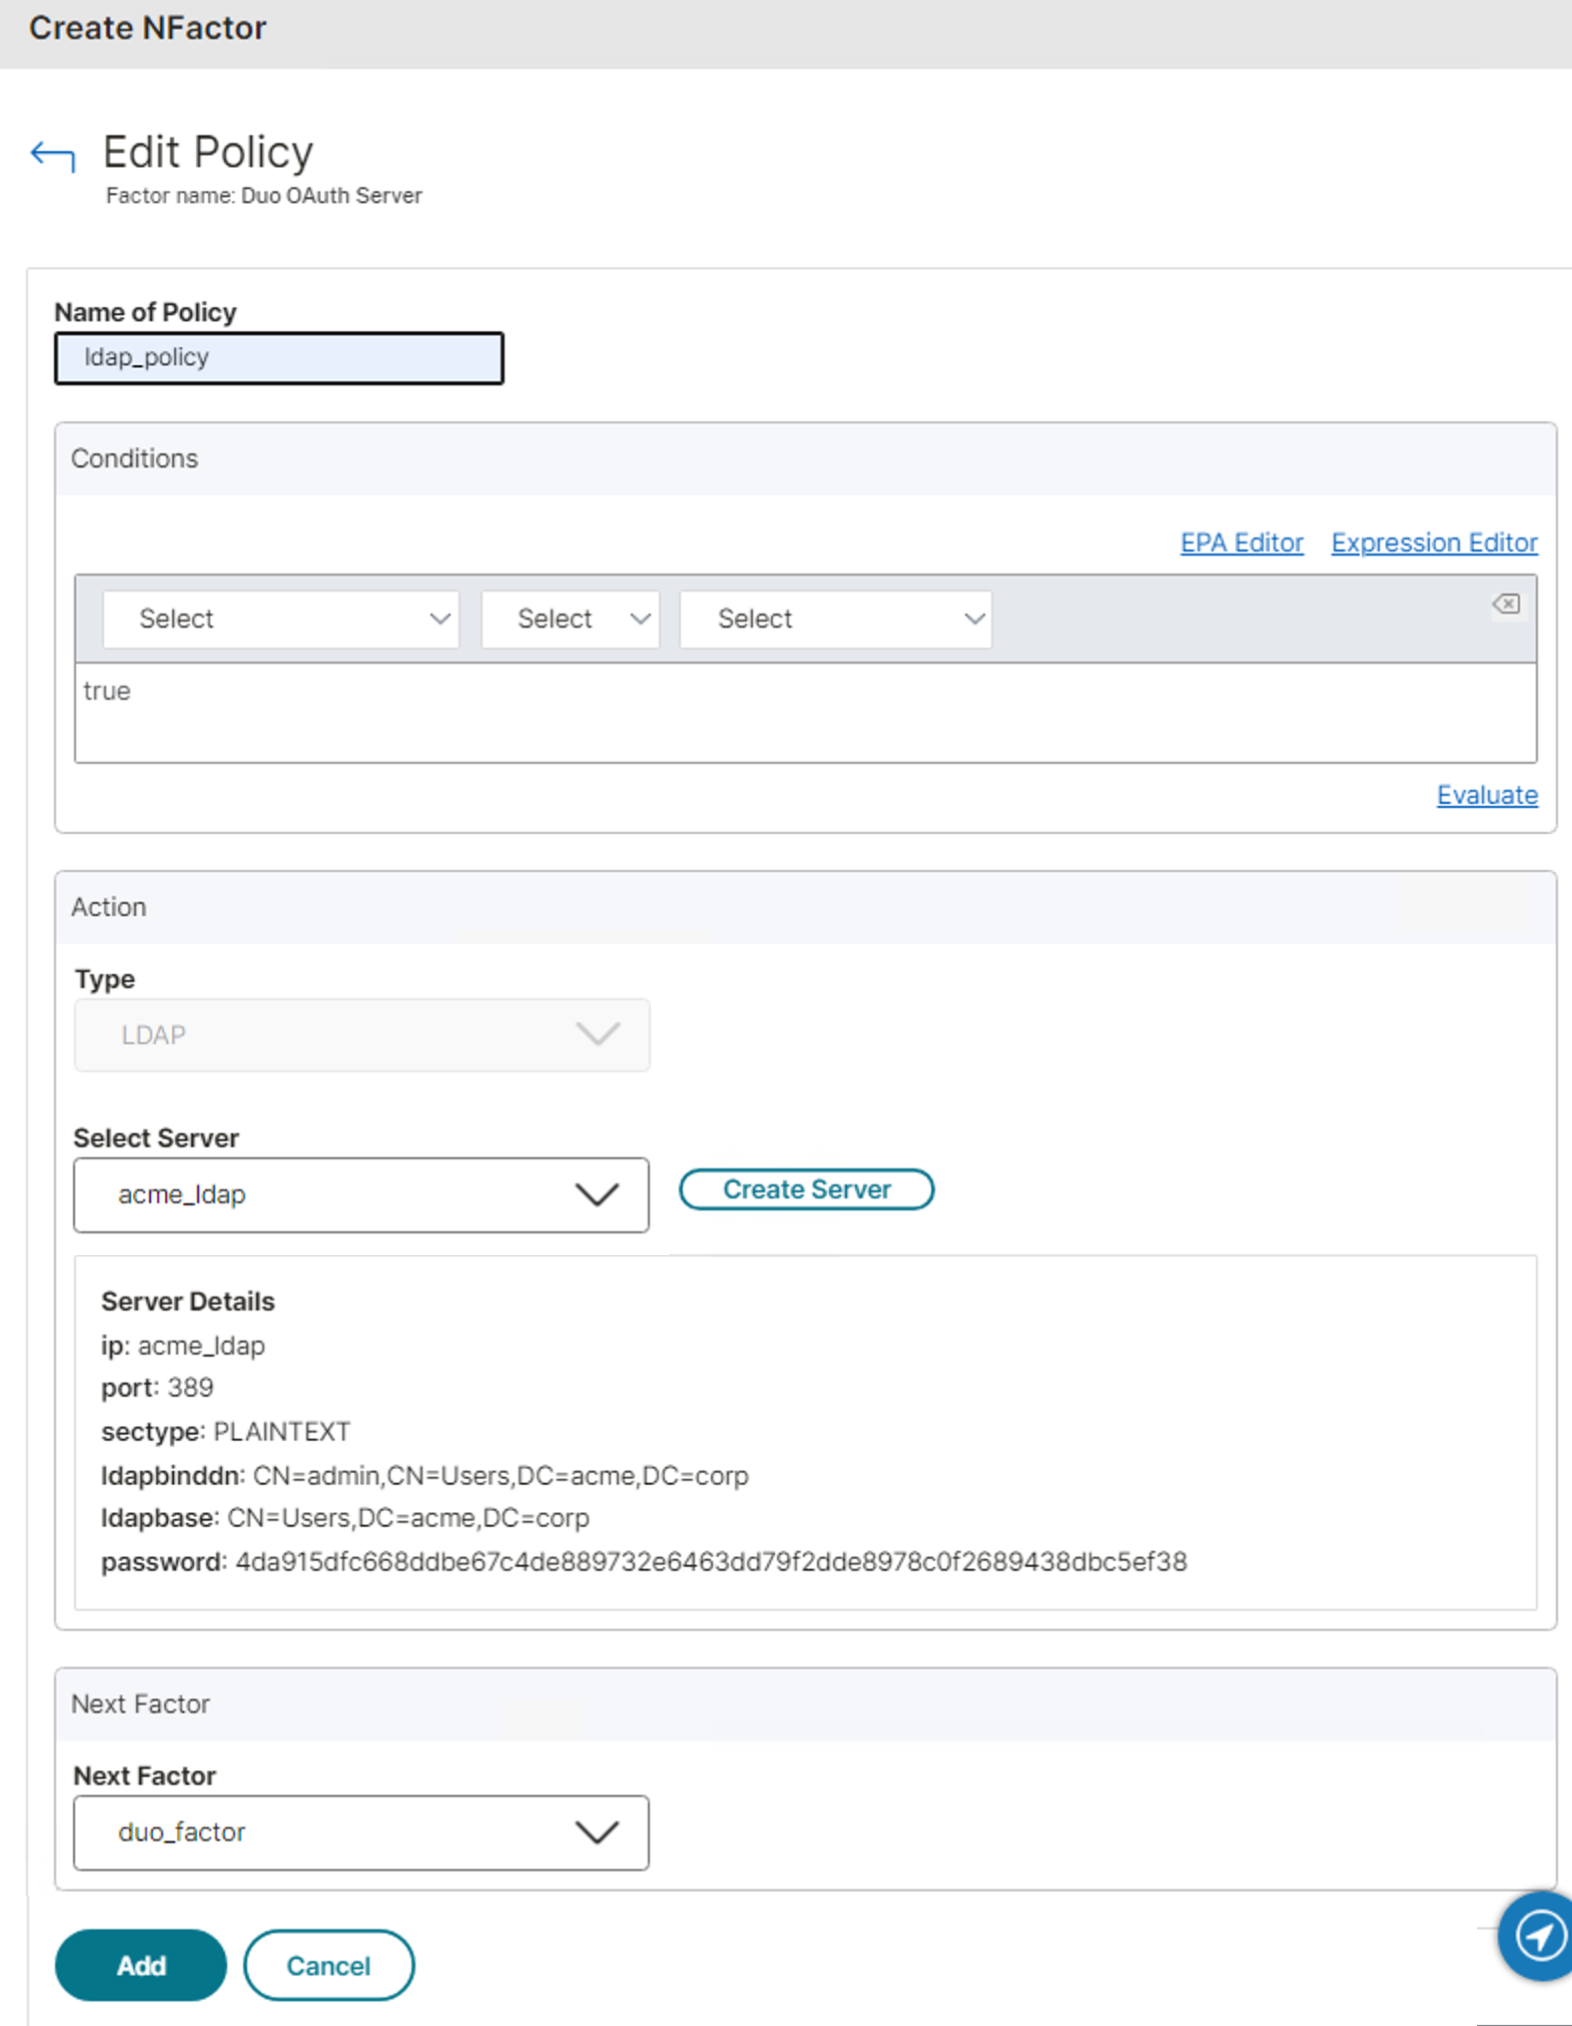
Enter a name for the LDAP policy, and then in the "Conditions" section type in true.
-
In the "Action" section, select your existing LDAP server from the Select Server drop-down to use it for primary authentication.
-
In the "Next Factor" section, select the Duo factor you just created using the Next Factor drop-down.
-
Click Add to exit the policy editor.
-
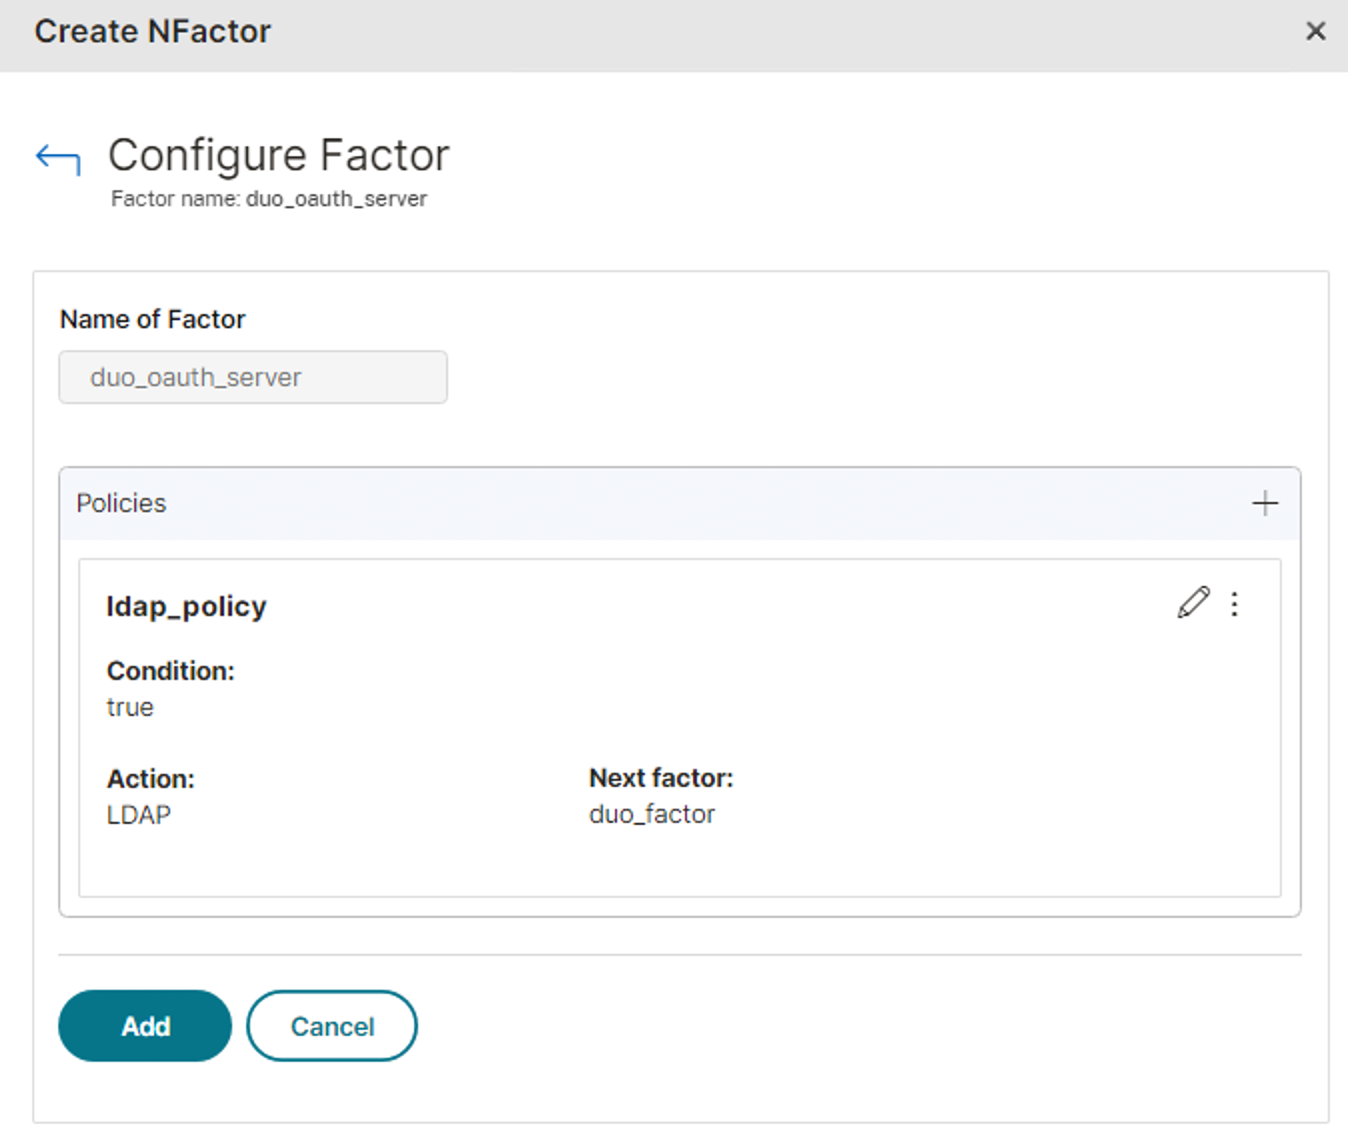
Click Add again to complete the LDAP factor configuration.
-
Click on the pencil icon in the "Second Factor" column to edit Duo second factor.
-
Click the pencil icon in the "Policies" section to open the policy editor.
-
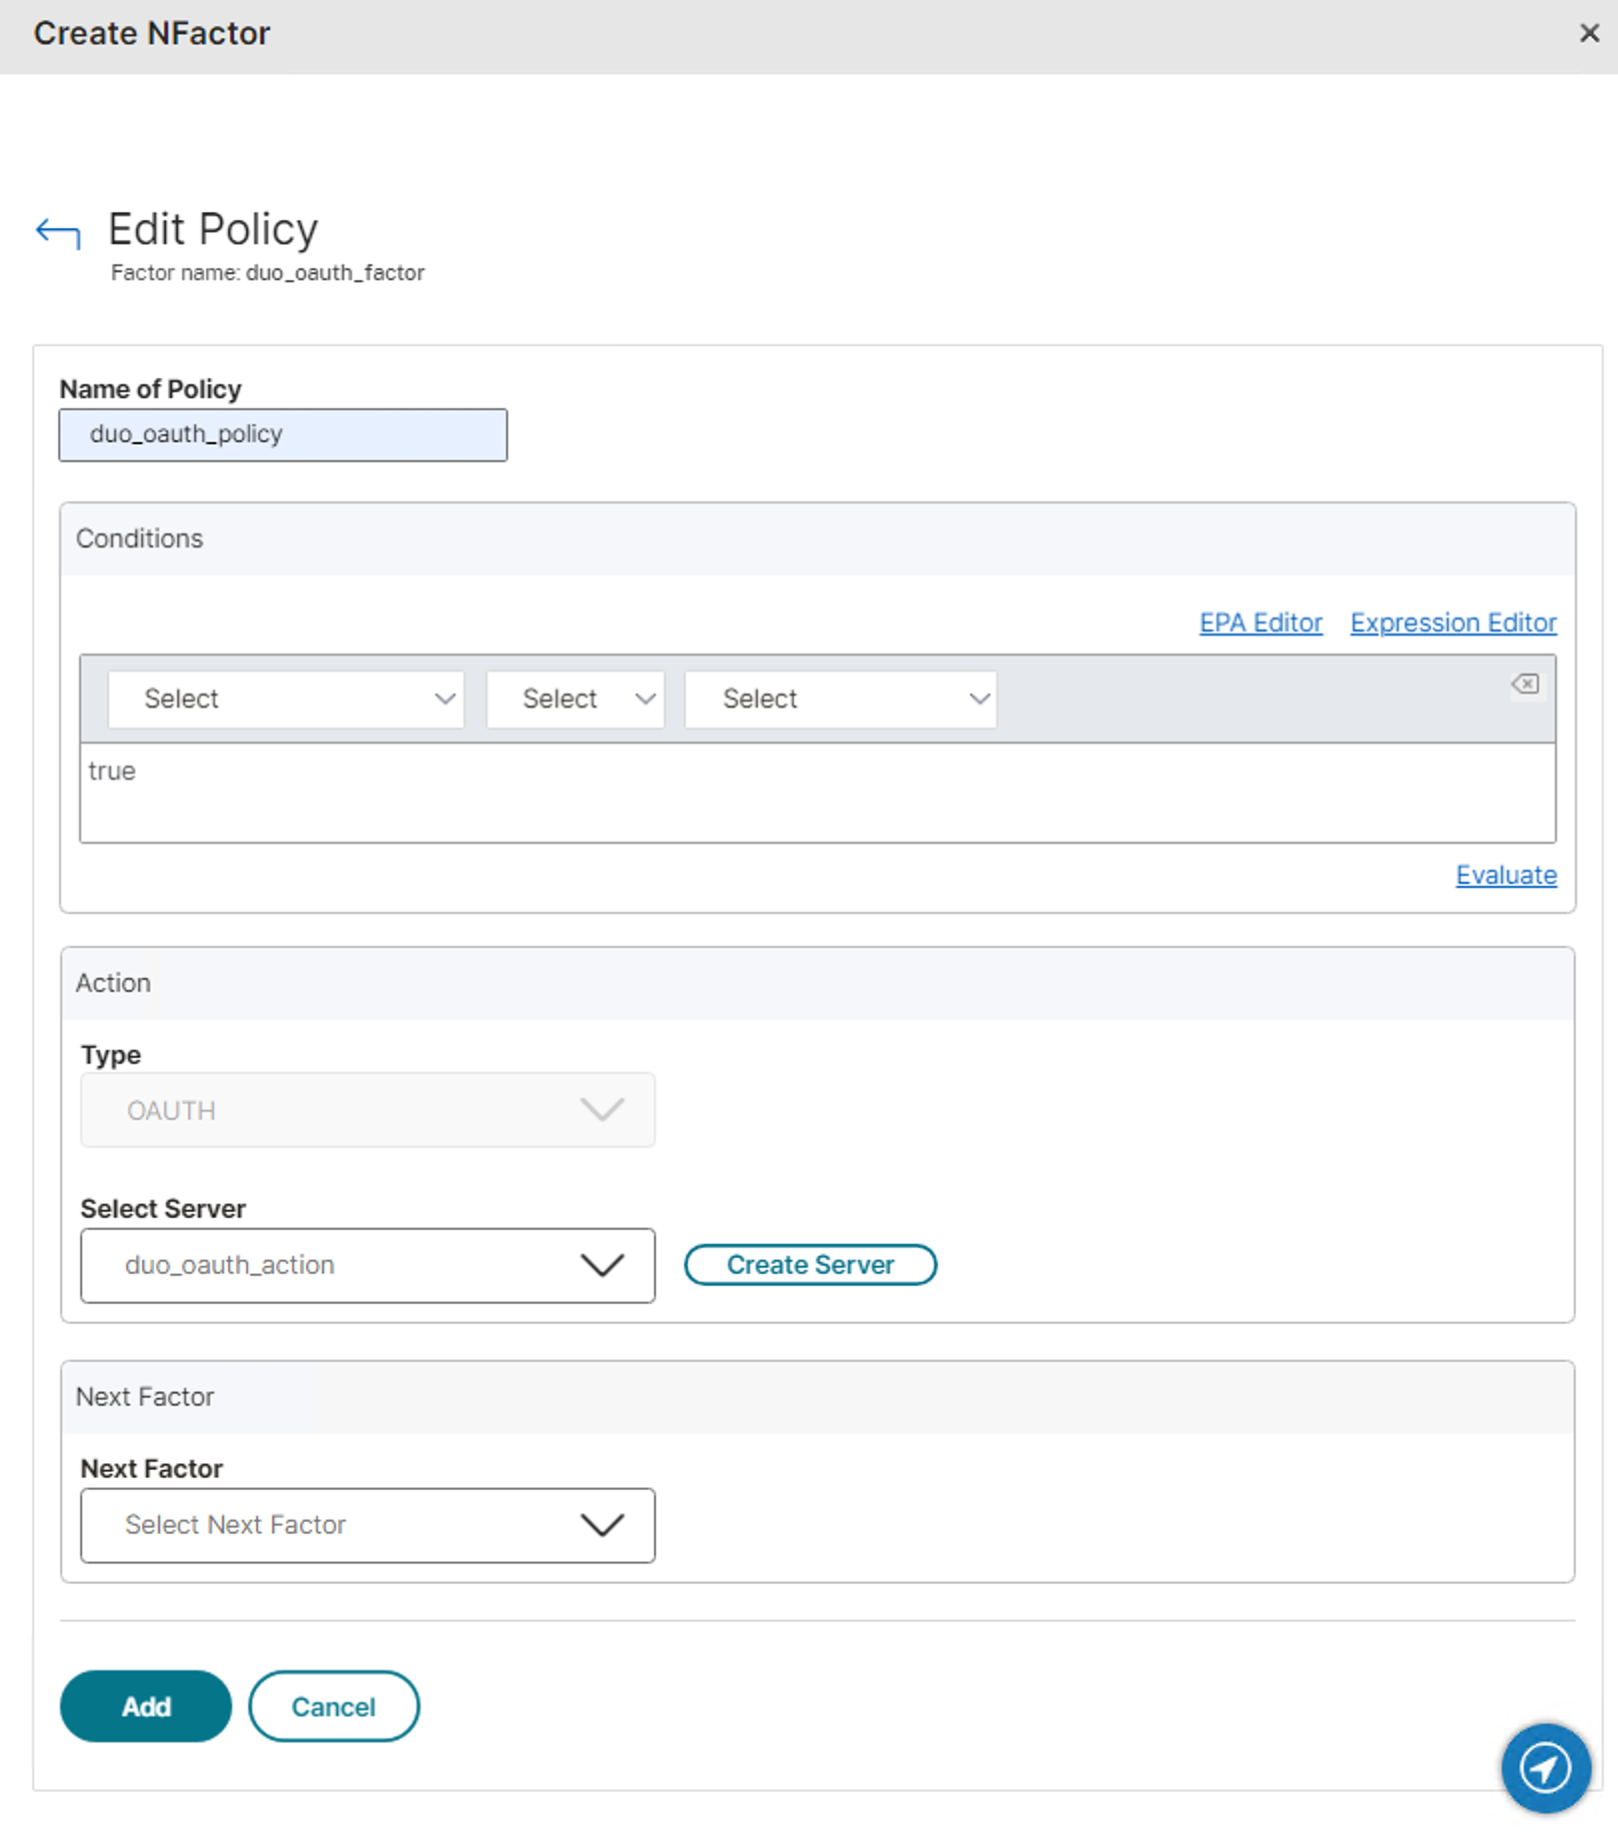
Enter a name for the Duo OAuth policy, and then in the "Conditions" section type in true.
-
In the "Action" section, select the Duo OAuth server action you created earlier in the CLI from the Select Server drop-down to use it for secondary authentication.
-
Click Add to exit the policy editor.
-
Click Add again to complete the OAuth next factor configuration.
-
Click Create to save the nFactor Flow configuration and return to the authentication virtual server configuration page.
-
Click Done to finish creating the new authentication virtual server.
Create an Authentication Profile for the Virtual Server
-
Navigate to Security → AAA - Application Traffic → Authentication Profile in the left panel of the NetScaler GUI.
-
Click Add.
-
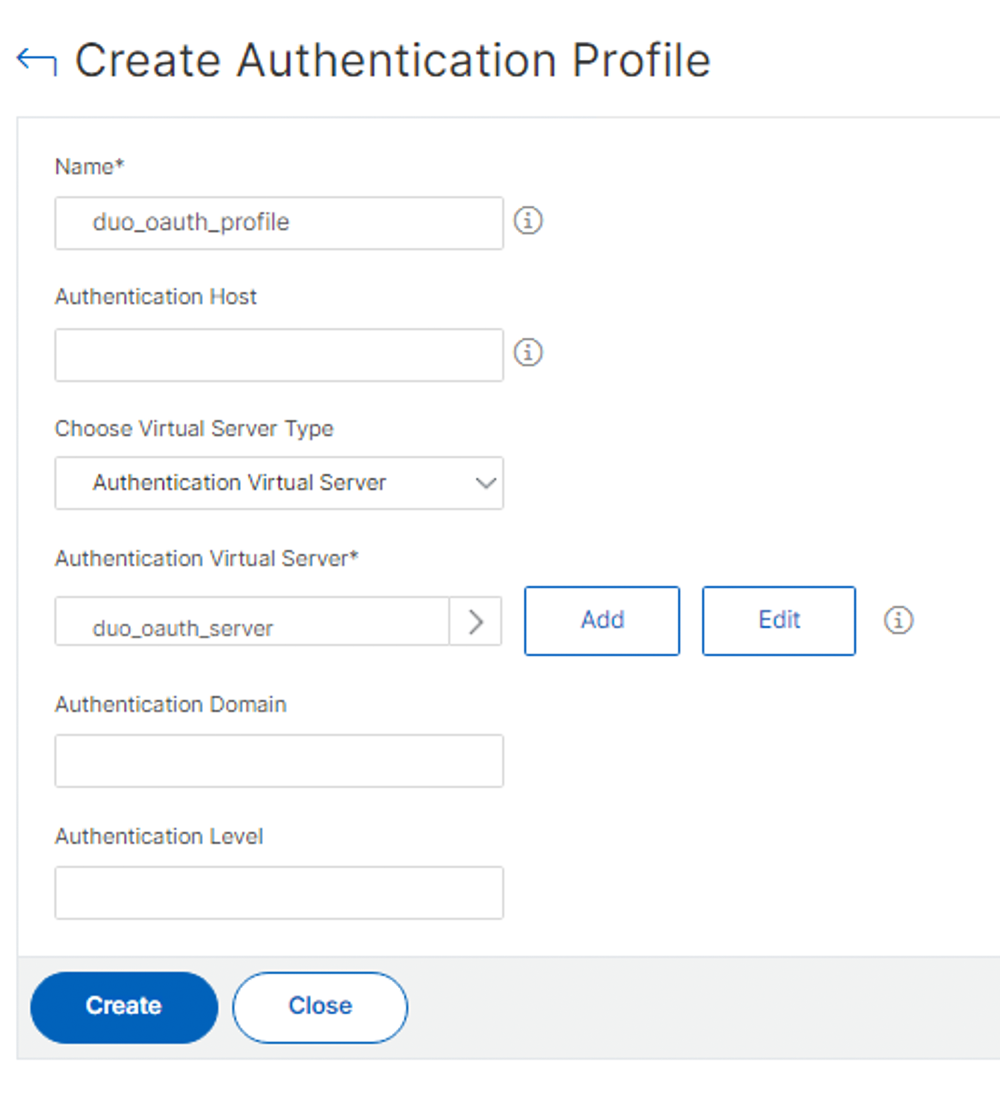
Enter a name for the new authentication profile.
-
Use the drop-down to select the Duo OAuth authentication virtual server you created earlier as your "Authentication Virtual Server".
-
Click Create.
Add Authentication Profile to NetScaler Gateway
-
Navigate to NetScaler Gateway → Virtual Servers in the left panel of the NetScaler GUI.
-
Select an existing NetScaler Virtual Server to which you want to add Duo, and then click Edit.
-
Click Authentication Profile within Advanced Settings on the right, or scroll down the virtual server properties page until you find the "Authentication Profile" section. Click the edit icon if you do not see the drop-down profile selector.
-
Select the Duo OAuth authentication profile you created earlier as your "Authentication Profile".

-
Click OK.
-
Click Done.
You may opt to create a new NetScaler Gateway virtual server for Duo instead of applying the Duo OAuth authentication profile to an existing Gateway virtual server. Learn more about creating virtual servers in the NetScaler documentation.
Add a Login Schema
-
Navigate to Security → AAA - Application Traffic → Virtual Servers in the left panel of the NetScaler GUI.
-
Select the Duo authentication virtual server you created earlier and click Edit.
-
Click Login Schemas on the right.
-
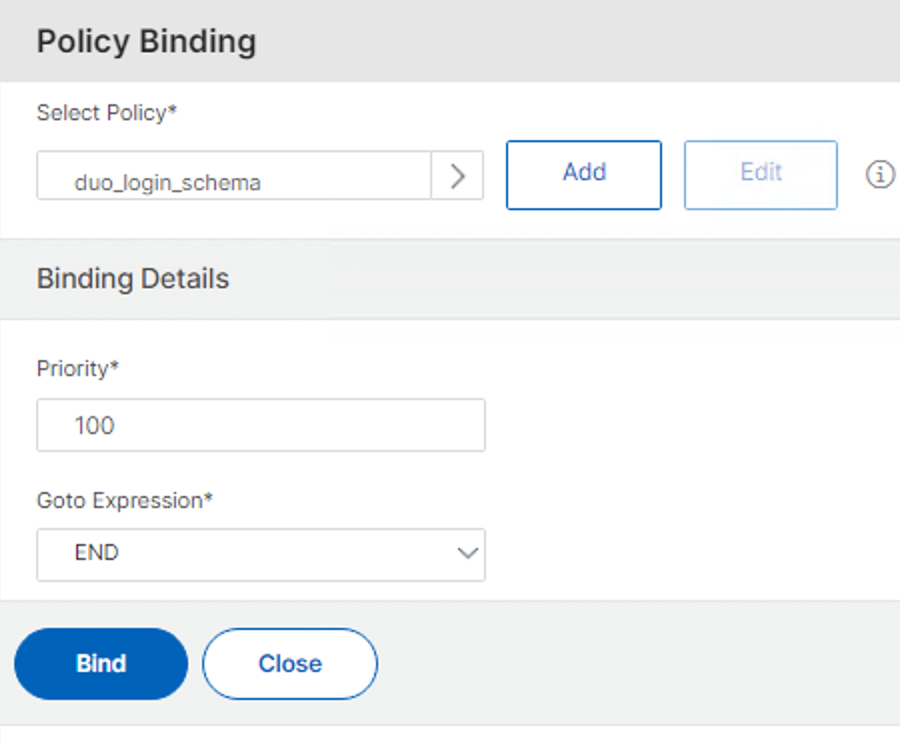
Click No Login Schema to open the "Policy Binding" page.
-
In the "Select Policy" section, click Add.
-
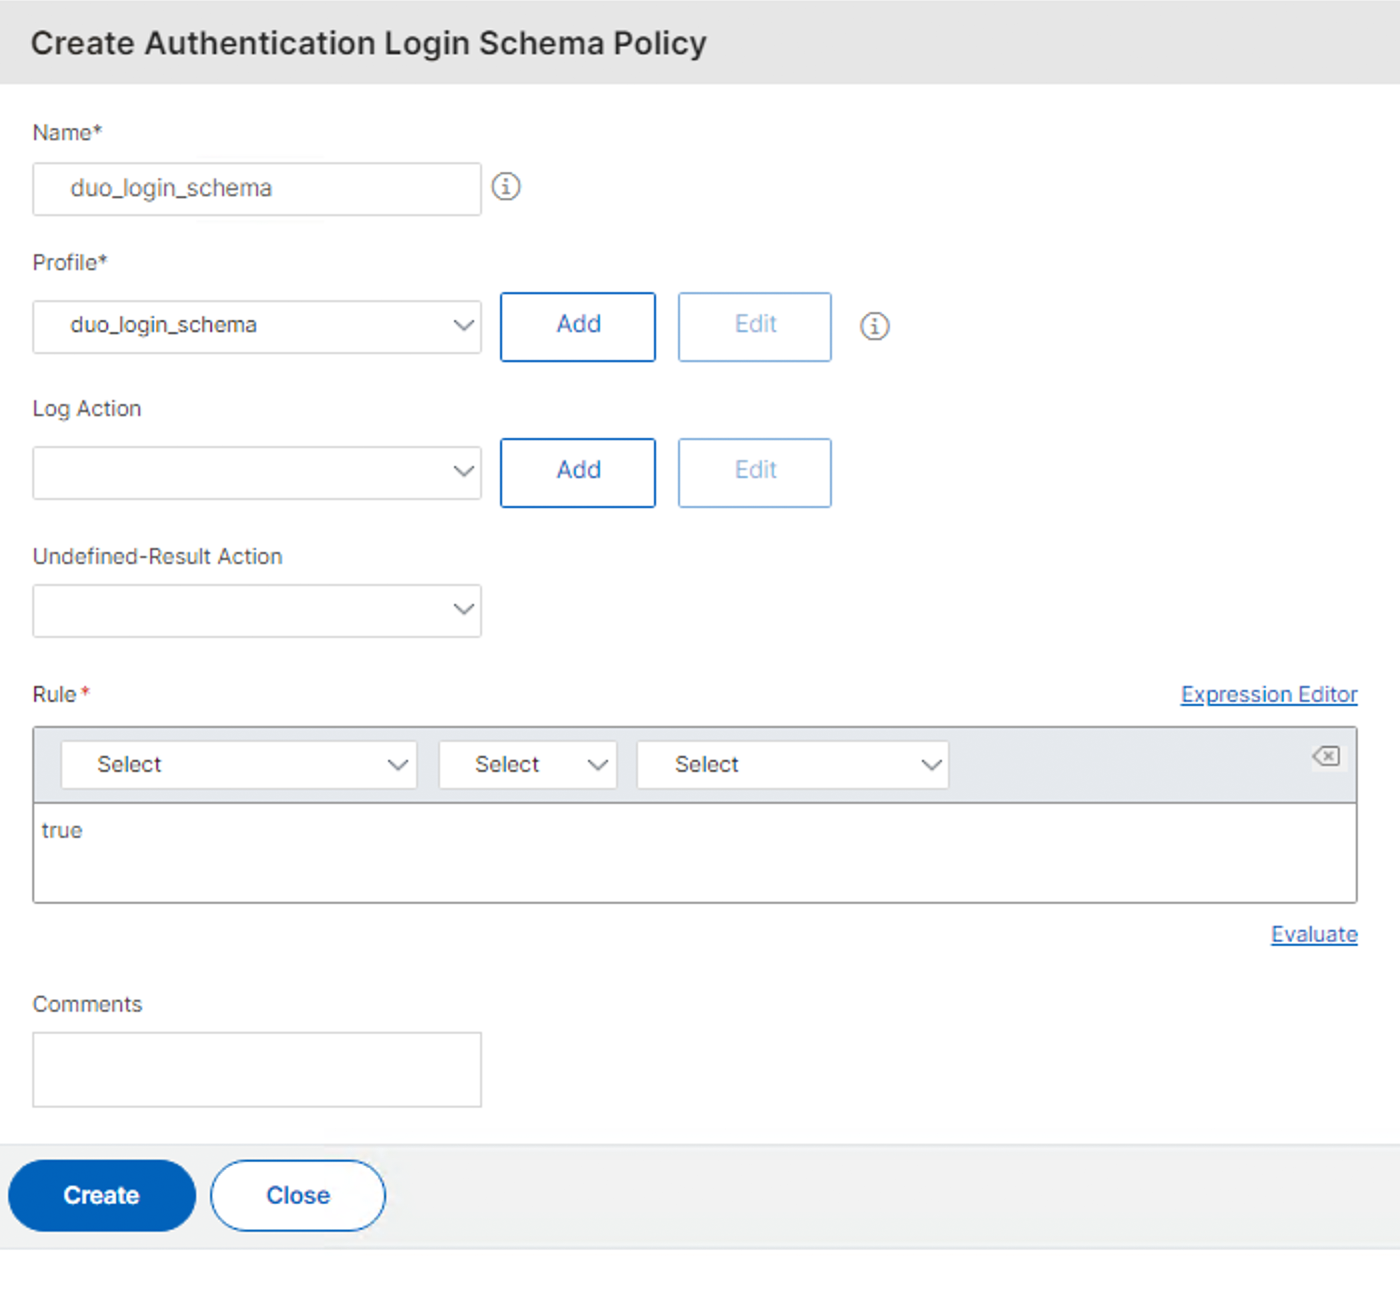
Enter a Name for the new policy on the "Create Authentication Login Schema Policy" page.
-
Click the Add button in the "Profile" section.
-
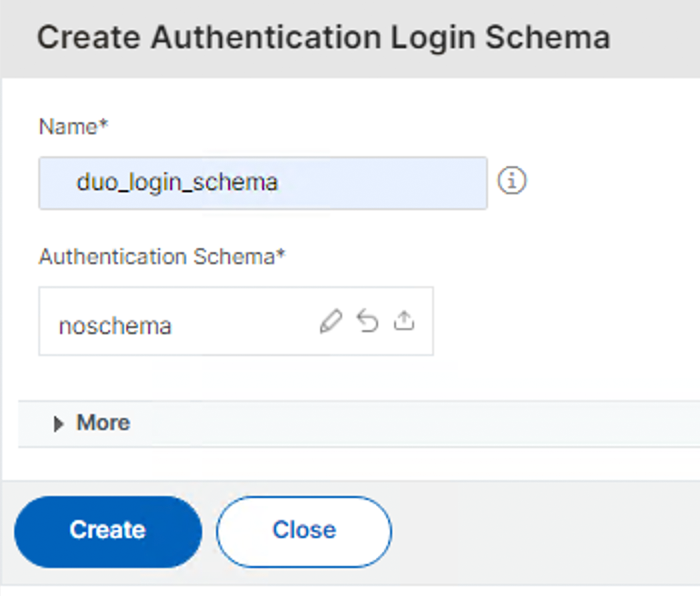
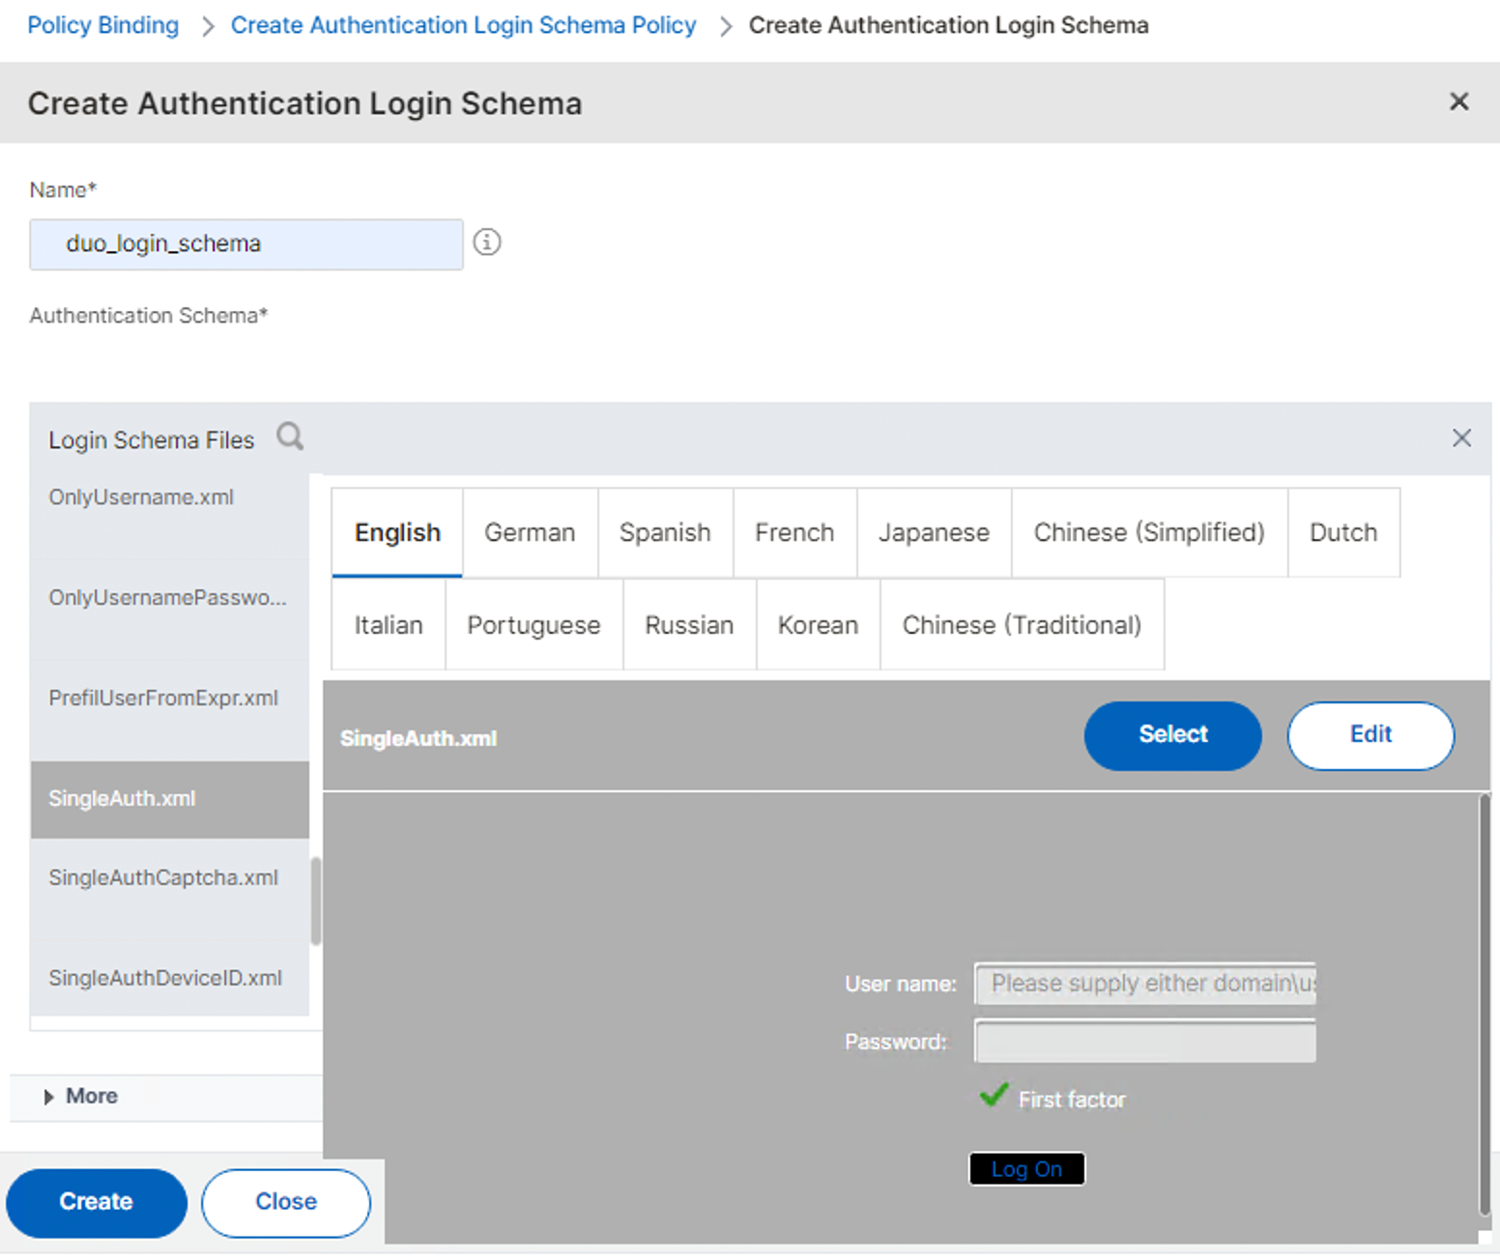
Enter a Name for the new authentication login schema and click the pencil icon next to noschema to open the editor.
-
Click the LoginSchema folder on the left, under "Login Schema Files". Scroll through the files list to find SingleAuth.xml. Click on that file, and then click the Select button on the right.
-
Click on More on the left to expose additional options.
-
Scroll down and check the Enable Single Sign On Credentials box.
-
Click Create to return to the "Create Authentication Login Schema Policy" page.
-
Type in true in the "Rule" section and then click Create to return to the "Policy Binding" page.
-
Click Bind to bind the new login schema to your Duo authentication virtual server.
-
Click Done to apply your changes.
-
Save all the changes made to the NetScaler's running configuration.
Test Your Setup
To test your setup, go to the URL you normally use to log in to your NetScaler as a user in a browser window. After you complete primary authentication at the NetScaler, you'll be redirected to the Duo Prompt or Duo user enrollment. Completing Duo authentication returns you to the NetScaler to complete your login.
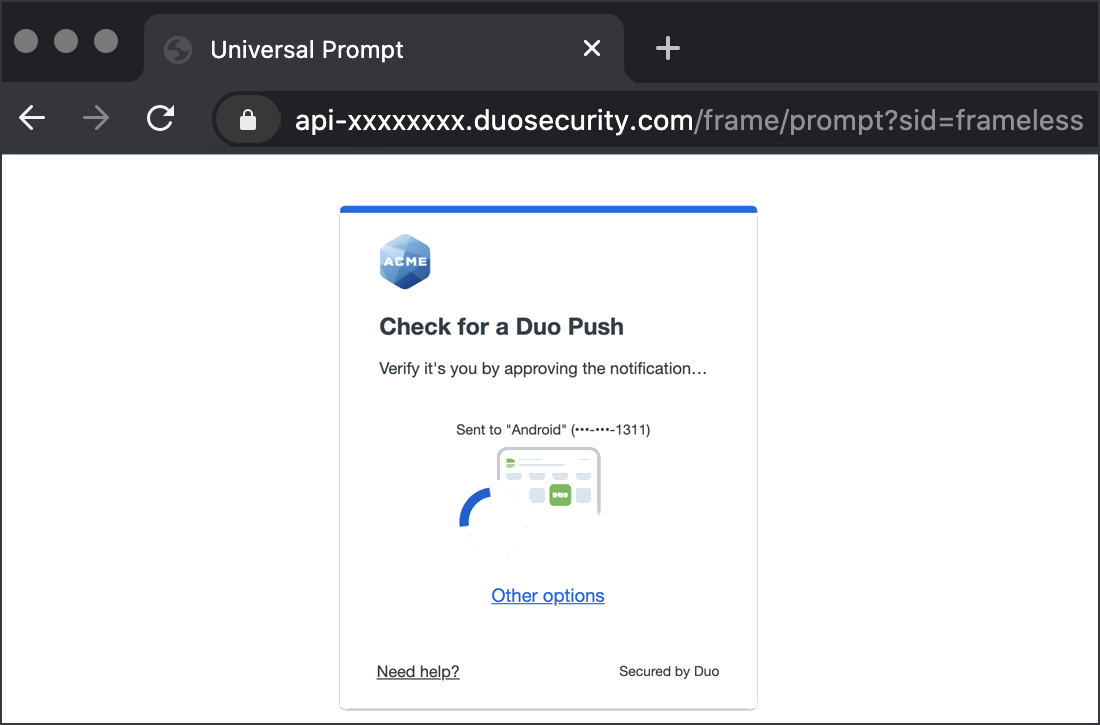
*Universal Prompt experience shown.
Troubleshooting
Need some help? Take a look at the NetScaler Frequently Asked Questions (FAQ) page or try searching our NetScaler Knowledge Base articles or Community discussions. For further assistance, contact Support.
Please see our FAQ if you are having an issue with existing iframe Duo web authentication after installing NetScaler firmware 14.1-29.63 to test Duo OAuth.
